Captainhemo's OB-7 Build

0 Members and 1 Guest are viewing this topic. Read 24033 times.

SlushPuppy

Re: Captainhemo's OB-7 Build
« Reply #20 on: 6 Mar 2013, 03:33 am »
It's been great watching your build Cap'n. Can't wait to see the final pics.

Captainhemo

Re: Captainhemo's OB-7 Build
« Reply #21 on: 6 Mar 2013, 04:59 am »
It's been great watching your build Cap'n. Can't wait to see the final pics.

Thanks man :)
I'm  getting anxious myself  !

-jay

Captainhemo

Re: Captainhemo's OB-7 Build
« Reply #22 on: 8 Mar 2013, 03:08 am »
Here is a bit more progress to   repott

Here a couple pictures  of the   first  speaker with the front baffle glued on.  After it sat clamped up overnight, I block sanded the sides  to get  final alignemnt with the front baffle. Turned out nice


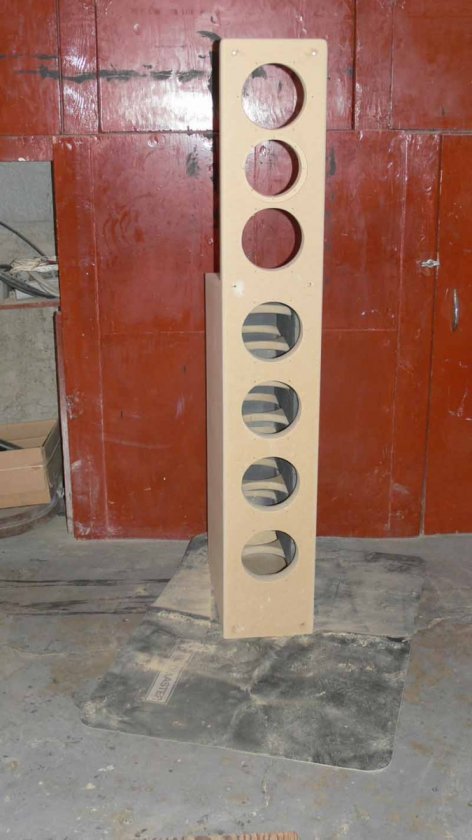
I'll  finish the round overs  on the back side of the baffle and  lower cabinets  after I   finish up the cross over boxes....

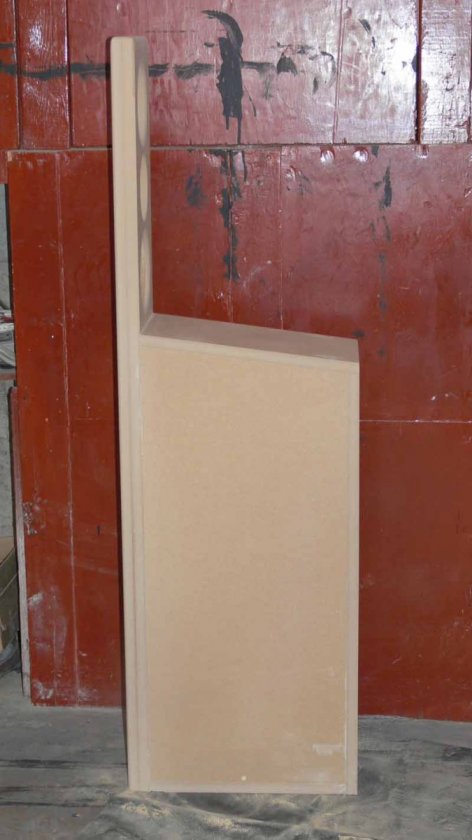
Speakig of those cross over boxes.  My original plan to make a  removabl3 box just big enough to  house the cross over isn't going to work.  I had already made up some boxes but when I clamped them into position to see how they looked , man  I don't know what the  heck I was thinking.   They looked very awkward so I had to scrap that idea    onto  plan B.

I'm going to have to make a 4" box   the full height of the  back of the cabinet and  glue it on.  Another seam to deal with  , but  at this point I don't know what else to do.  I will make the lid for the box in 2 parts., the lower part being  glued on permanently witht he electra tubes  mounted in it.  The top part I will make removable to   be able to access the  cross overs and BMS .  Wish I had thought of this earlier  and I would have  just  made the side panels 4.75" longer and  hd them  sandwich and overlap the rear baffle. 
The cabinets are gong to end up being  4.5" deeper  but the internal volume will remain the same.  I'll also have to remake some new bases as I had already cut the    ones I  laminated  to  size, they will be too short now.

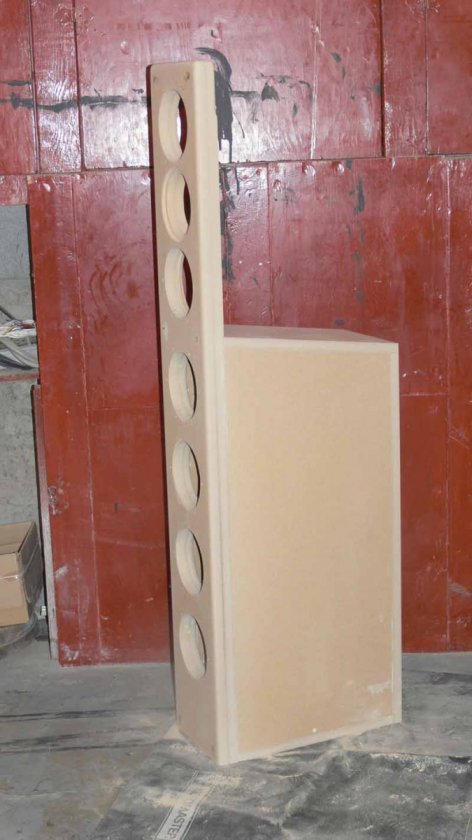
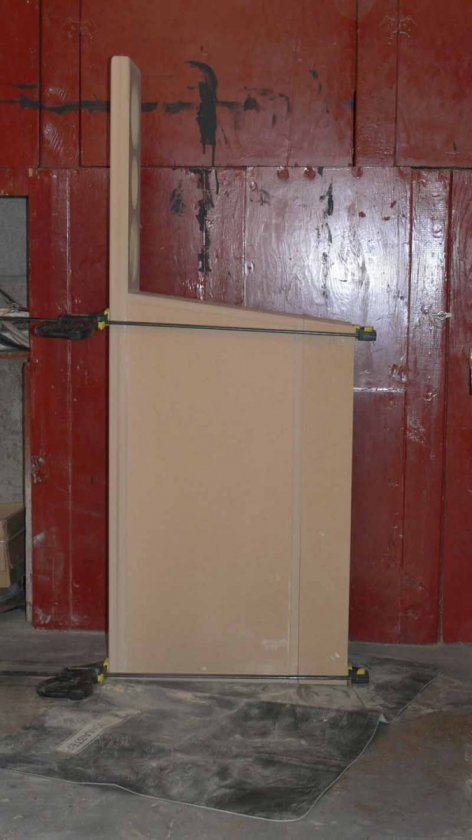
Here  is a picture  without the  box and  a 2nd one  with the  box clamped into position


If anyone else who  ubild  OB7's or any other   speakrs with external cross overs has any suggestions or pictures , I'd love to read about  /see pics of how you covered them before I glue these on

-jay

aron944

  • Jr. Member
  • Posts: 9
Re: Captainhemo's OB-7 Build
« Reply #23 on: 10 Mar 2013, 05:54 pm »
Looking great! Your build piqued a question I have had but never bothered to ask. When I built my OB-7 I ended up with a baffle thickness of roughly 1.5 inches, where the plans only call for 1", I didn't know if this difference would impact the ob null frequency enough to make it a bad idea? My boxes are currently temporary (just wanted to hear them too bad!) So I figured I would build to spec on the final boxes... Maybe not such a big deal?

Captainhemo

Re: Captainhemo's OB-7 Build
« Reply #24 on: 10 Mar 2013, 06:12 pm »
Looking great! Your build piqued a question I have had but never bothered to ask. When I built my OB-7 I ended up with a baffle thickness of roughly 1.5 inches, where the plans only call for 1", I didn't know if this difference would impact the ob null frequency enough to make it a bad idea? My boxes are currently temporary (just wanted to hear them too bad!) So I figured I would build to spec on the final boxes... Maybe not such a big deal?

I did the entire baffle 1.5" thick too.  I think the thicker  you go, the  bigger  the radius of the  roundover on the  back side  should be.  I used a 7/8" radius on the rear of all the woofer holes.
I also found a bit of a descrepancy in the plans.... If you  cut everything according to the cut list  and assembel the   lower cabinets, you will end up   with a cabinet  height of 32" (bottom plate .75" + side panel 30.5" + top plate .75" = 32").  This ends up bringing the bass cabinet   .75 " closer to the  lower woofer of the OB section so just something to watch out for.   The lower cabinet should be 31.25" tall which it DOES show  in the  actual drawing,  just doesn't quite  jive with the cut list that's all.   I just ended up cutting 1.4" off the top , then gluing a new 3/4" plate on top to end up at the required 31.25"

-jay

-jay

aron944

  • Jr. Member
  • Posts: 9
Re: Captainhemo's OB-7 Build
« Reply #25 on: 10 Mar 2013, 06:47 pm »
When I saw that you had that issue I had to laugh, I had the exact same issue but assumed I had done something wrong didn't even take time to double check... My solution for the initial cabinets was far less elegant than yours :) .

Nick77

Re: Captainhemo's OB-7 Build
« Reply #26 on: 10 Mar 2013, 08:39 pm »
I had the same idea but your solution looks much better, you will grow to appreciate the external crossover.
I thought you had to saw off the 3 degree rake? They are looking good!  :thumb:


Captainhemo

Re: Captainhemo's OB-7 Build
« Reply #27 on: 11 Mar 2013, 12:40 am »
When I saw that you had that issue I had to laugh, I had the exact same issue but assumed I had done something wrong didn't even take time to double check... My solution for the initial cabinets was far less elegant than yours :) .

Yeah,  I'd imagine a few people have run into this.  I kicked myself for not paying more attention to the actual drawing instead of the cut list  :duh:

I had the same idea but your solution looks much better, you will grow to appreciate the external crossover.
I thought you had to saw off the 3 degree rake? They are looking good!  :thumb:

When I cut the original tops off,  I     cut it at an 8 degree slope starting at the front at  30.5".  Then when I glued my new  3/4" top on,it come out to  31.25"   and still had the 8 drgree slope.   My table saw wasn't anywhere near big enough so  I took  them to a cabinet guy and he   did it on a big sliding table saw... cost me $20  but was well worth it.

I was going to do the exact ame thing with my cross overs, then had the idea of doing the full length box.  Even with that,  I  just didn't like  how the appearence of the cabinets was changed,  it just didn't look  right with that extra depth to me. Probably would have never noticed once  they were in position and not being  viewed from the side  but it was bugging me.
 After discussing it with a  couple people (thnx  Ron and PDR) I have now decided to go  with  some remote boxes that I can just place behind the speakers.   I can also disconnect them and take them over to the workbench. if I need to make changes. I was  actually able to use the fir st boxes I made and just alter them a bit  to make the remote boxes..
Should have some  pictues to show progress tomorrow. Getting closer 

PDR

  • Full Member
  • Posts: 820
  • May the best man win
Re: Captainhemo's OB-7 Build
« Reply #28 on: 11 Mar 2013, 05:12 am »
 :thumb:....glad I could be of help.

Captainhemo

Re: Captainhemo's OB-7 Build
« Reply #29 on: 11 Mar 2013, 11:56 pm »
Here are a few more pictures.
 I have prettymuch finished off the   construction of the cabinets  now.   Today I got the .75" round over done on all the outside edges.  The   top of the rear baffle had to be  finished by hand  as   I couldn't    get the full round over  due to the  slped top   but it came out fine.


After the round overs were done, I gave  both the cabinets   a  couple of good   sandings again  There is one little spot  near the bottom edge of  one  cabinet that needs  a little  filler  but   other than that,   they are pretty much there. 


 Here is the first remote box  pretty much done as well.  Still have to drill holes for  electra tubes (inputs  and  holes for   leads coming from  the box. These leads will be  short as I plan to keep the boxes  right behind the speakers.  Lids are  attached with 6  1.25"  screws.  I still may  add a roud over to the boxes so they  match the cabinets


I just glued the base on the 2nd box so it is in clamps for the night.  I will  finish that one off  tomorrow as well as  get the bases mounted to the cabinets.  I'm still  going to roll some   glue over all the seams to seal    the cuts up.  I'll probably use the Behr Premium paint/primer   as a primer again as I did with the N3's.  It covered well and sanded  very smooth

-jay

NeilT

Re: Captainhemo's OB-7 Build
« Reply #30 on: 12 Mar 2013, 03:14 pm »
Looking very good Jay, thanks for the pics and keep em coming  :D.

Neil

Captainhemo

Re: Captainhemo's OB-7 Build
« Reply #31 on: 12 Mar 2013, 09:45 pm »
Just a quick post  showing   what I am thinking of doing for final color
The cabinets will be primed,   sprayed with truck bed liner ( I really like the textrue of the spray on stuff) and finally topped with  aged copper.  I have  a lot of browns in  the room   so  I thoiught copper would look good, especailly with the black drivers and  black grill.
Here is a picutre of  a piece of MDF sprayed with  the TBL  then topped with aged copper...
Comments / opinions  ?  LMK what you  think


gregfisk

  • Restricted
  • Posts: 1349
  • Us alone in the universe? sure is a waste of SPACE
Re: Captainhemo's OB-7 Build
« Reply #32 on: 12 Mar 2013, 09:55 pm »
Your project is looking really good! It's hard to see the color, for me anyway. Maybe you could set it on something black or maybe white to show the color better.

Greg

Captainhemo

Re: Captainhemo's OB-7 Build
« Reply #33 on: 12 Mar 2013, 11:32 pm »
Not sure this will help a lot but here's another shot.  It's really hard to  get a good picture of it.  This is closer to what it actually looks like but   still not   the same as it looks.  It's a  dark copper color


-jay

sl_1800

  • Full Member
  • Posts: 406
Re: Captainhemo's OB-7 Build
« Reply #34 on: 13 Mar 2013, 12:23 am »
That color is hard to see, it looks somewhat like the color of raw mdf in those pics.  What truck bed coating did you use?

Captainhemo

Re: Captainhemo's OB-7 Build
« Reply #35 on: 13 Mar 2013, 12:40 am »
That color is hard to see, it looks somewhat like the color of raw mdf in those pics.  What truck bed coating did you use?

It is the  Rust Oleum stuff available from Home Depot.  I used it on my N3 Tl's   and really like it.   Wanted to do something a bit different with  these  which  was why I'm  leaning towards the  aged copper over the bed liner
I know what you  are saying about  the color being hard to see...    I'll take another one later with a piec f MDF beside it.  It actually is quite mettalic, just can't seem to get the right  light  to  show it

-jay

Captainhemo

Re: Captainhemo's OB-7 Build
« Reply #36 on: 13 Mar 2013, 01:23 am »
Here is one more  beside  a piece of raw MDF and taken  on  a bit more of an angle to reduce glare and show a bit of the textrue.
Shows a better


« Last Edit: 18 Mar 2013, 11:56 pm by Captainhemo »

SteveRB

Re: Captainhemo's OB-7 Build
« Reply #37 on: 13 Mar 2013, 02:20 am »
I agree that the texture of the truck bed liner spray is fantastic. However, it is hardly tough enough for a truck liner. I have nick'ed my a couple times over the past few months -- it is less than robust.

But it does looks great.

Captainhemo

Re: Captainhemo's OB-7 Build
« Reply #38 on: 14 Mar 2013, 04:24 am »
I agree that the texture of the truck bed liner spray is fantastic. However, it is hardly tough enough for a truck liner. I have nick'ed my a couple times over the past few months -- it is less than robust.

But it does looks great.

hehe, maybe they should change the name to associate it with speaker cabinets  :)  I told the lady at HD thats's what I was using it for and she thought that was pretty cool.

Just  one picture today.
I sparyed the bottoms of the bases last night with  bed liner  so that I could   install the floor spike inserts  this  moning.   I put a bit of PL Premium in each hole before  installing the inserts to help keep them  in place.   After that I mounted the bases onthe cabinets.  Ran into a bit of an issue here... I guess when  I had been block sanding the  bottom panels,  I must have   been rolling  the  block over the edges a bit.  When I  mounted the bases and tightened the screws,  it left a  little gap all around the edge. I checked with a piece of paper to make sure it was just the edge  not making contact .  This was ndeed the case  so  I just used a bit o wood filler  between the bottom edge of the cabinet and the   base.  After it dreied for a couple hours,  I  sanded  it down smooth and then    blocked the entire cabinet one more time with 400 grit  Also   did all the round  overs   with a pirec of foam  and   400 grit too


-jay

« Last Edit: 14 Mar 2013, 05:34 am by Captainhemo »

sl_1800

  • Full Member
  • Posts: 406
Re: Captainhemo's OB-7 Build
« Reply #39 on: 14 Mar 2013, 02:27 pm »
Those are looking good