Finishing the Super Mini

0 Members and 1 Guest are viewing this topic. Read 2156 times.

mzbrahce

  • Jr. Member
  • Posts: 75
Finishing the Super Mini
« on: 5 Oct 2023, 08:20 pm »
I purchased a pair of Super Minis from another AC member several months ago.  They were assembled from a flat-pack, but not finished.  Crossovers were not mounted.


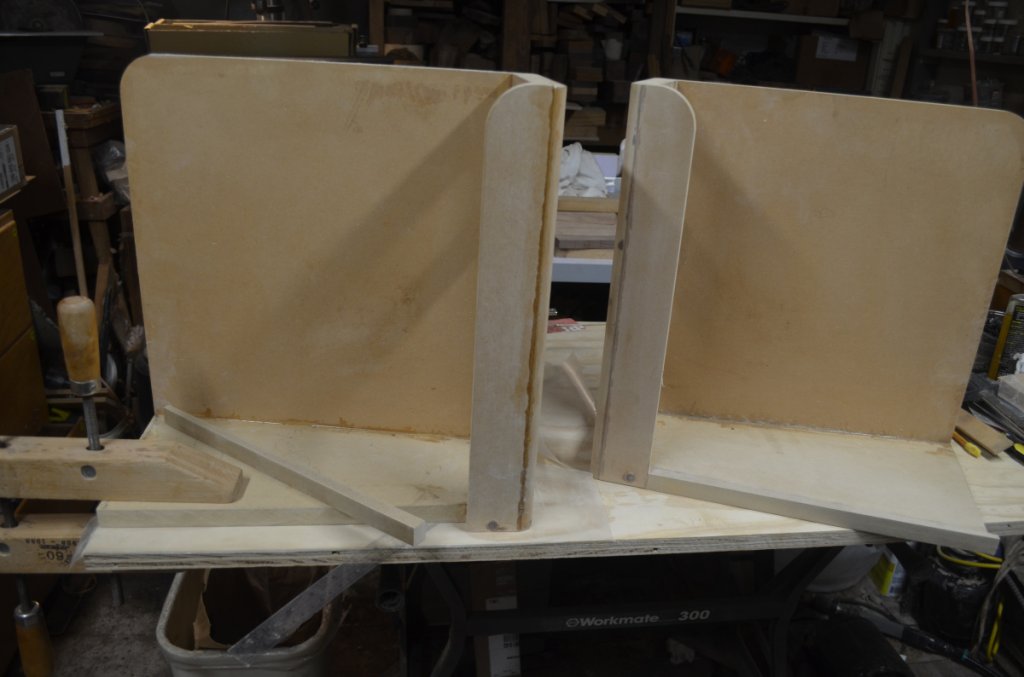
The first thing I did was add a filler piece of MDF to extend the edge of the base on the short wing side to make it even with the outside of the short wing, getting rid of the notch you can see on the Super Mini to the left.  The Mini on the right has the filler piece glued in place.
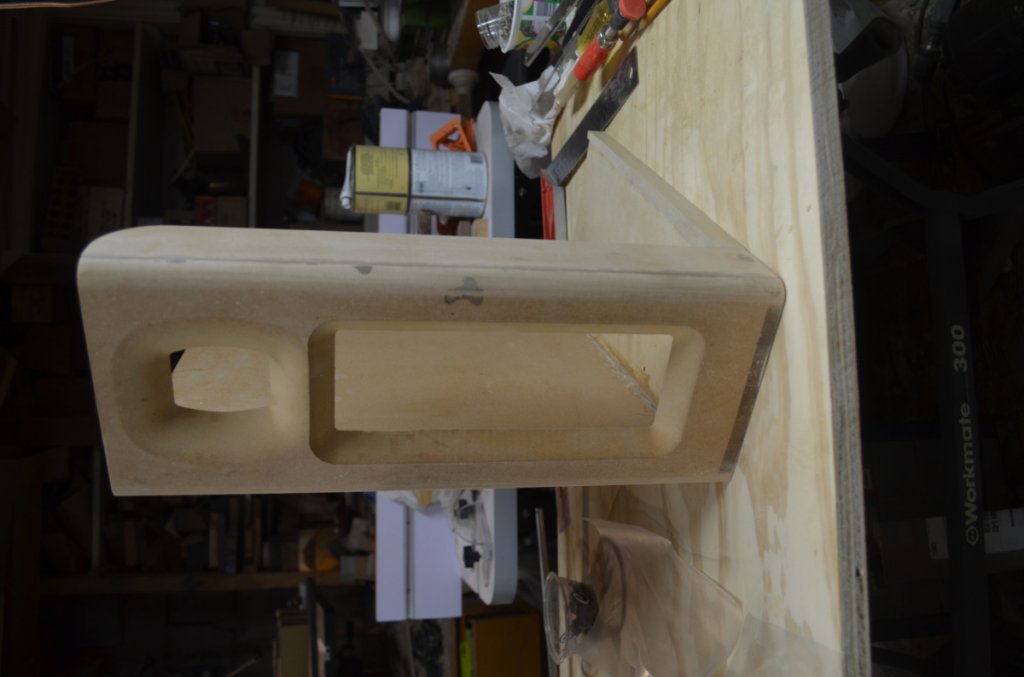
Next, I filled in all holes, cracks and gaps where pieces were joined, including the driver mounting holes on the inside of the baffle, using small dowels and epoxy on the mounting holes, epoxy on the other holes and small gaps, and Bondo on the larger gaps. 


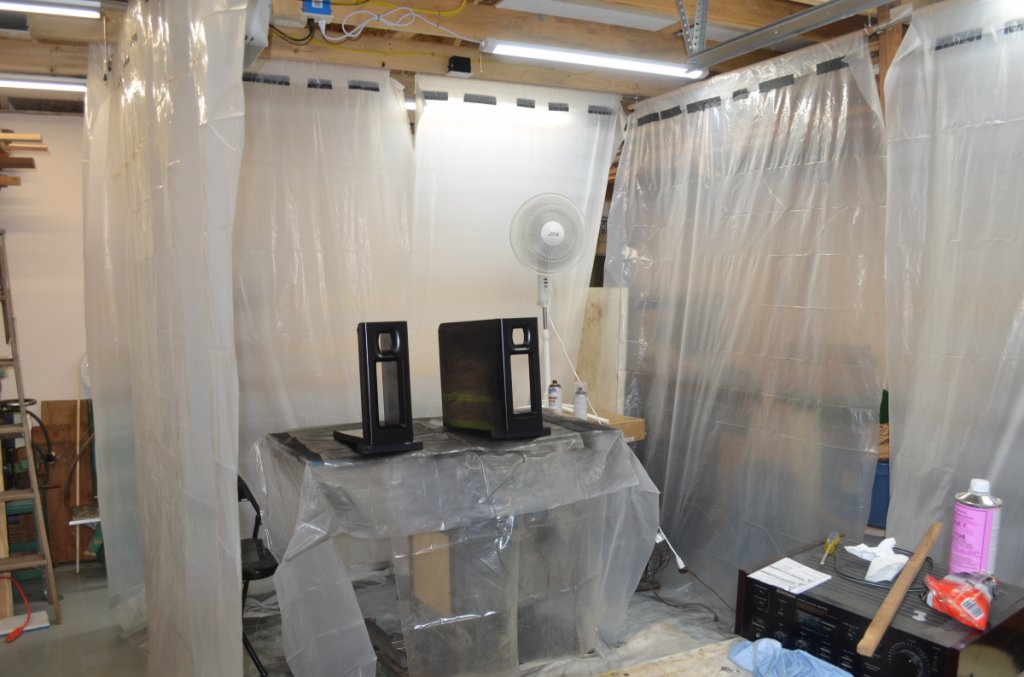
While continuing the prep work, I contacted AC member Nlitworld who has offered to advise others on their painting projects, and he offered to give me a hand.  After describing the project to him, Lloyd replied with a list of supplies to purchase, including personal protection gear, the correct paint, wiping cloths, tack cloths, cleaning solvent, complete with part numbers.  He provided information on how to set up a spraying area, and detailed instructions on completing the prep work, how to spray, what to do between coats.
THANKS LLOYD!!
This is what the spraying area looks like, set up in the middle of my new garage:


One of the Super Minis after the final primer coat:


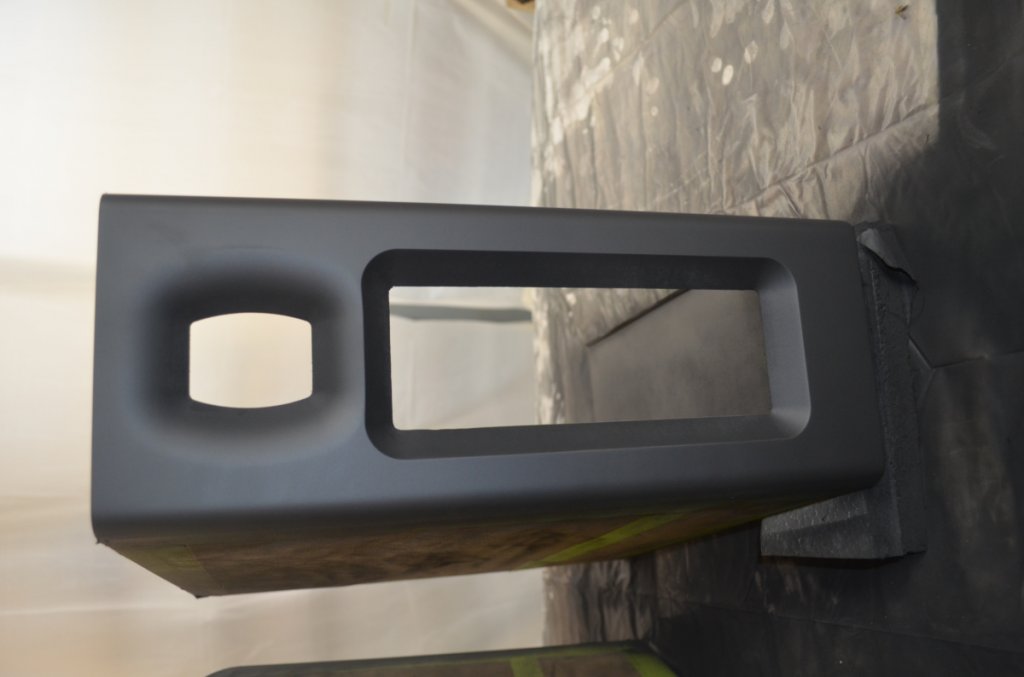
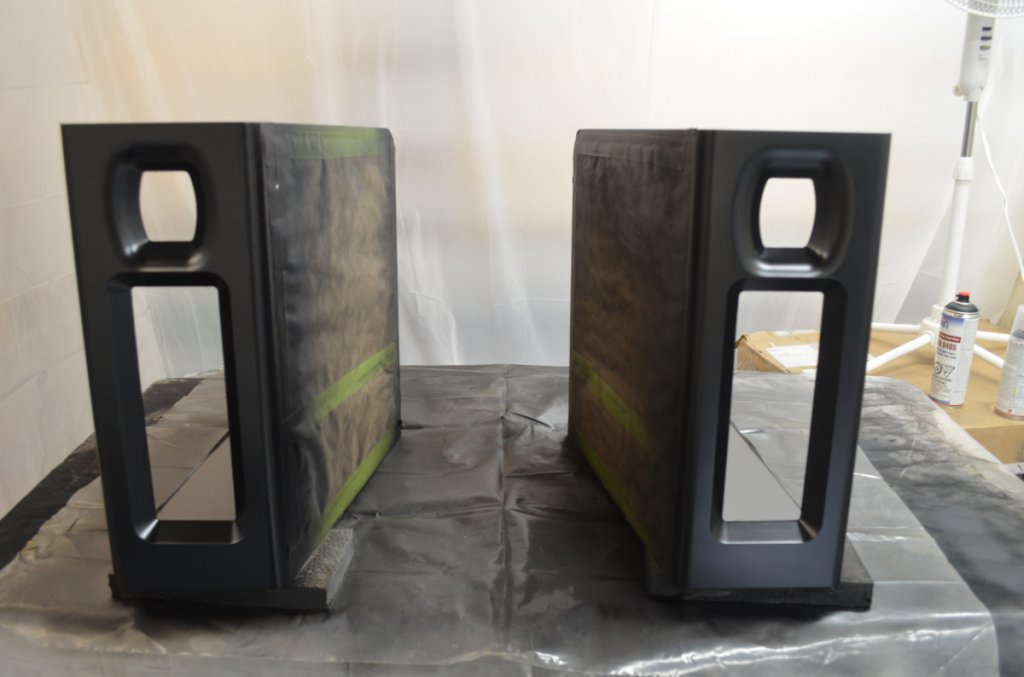
Both Minis after the first two coats of epoxy-based semi-gloss black, applied 10 minutes apart.  They look pretty good from a distance:


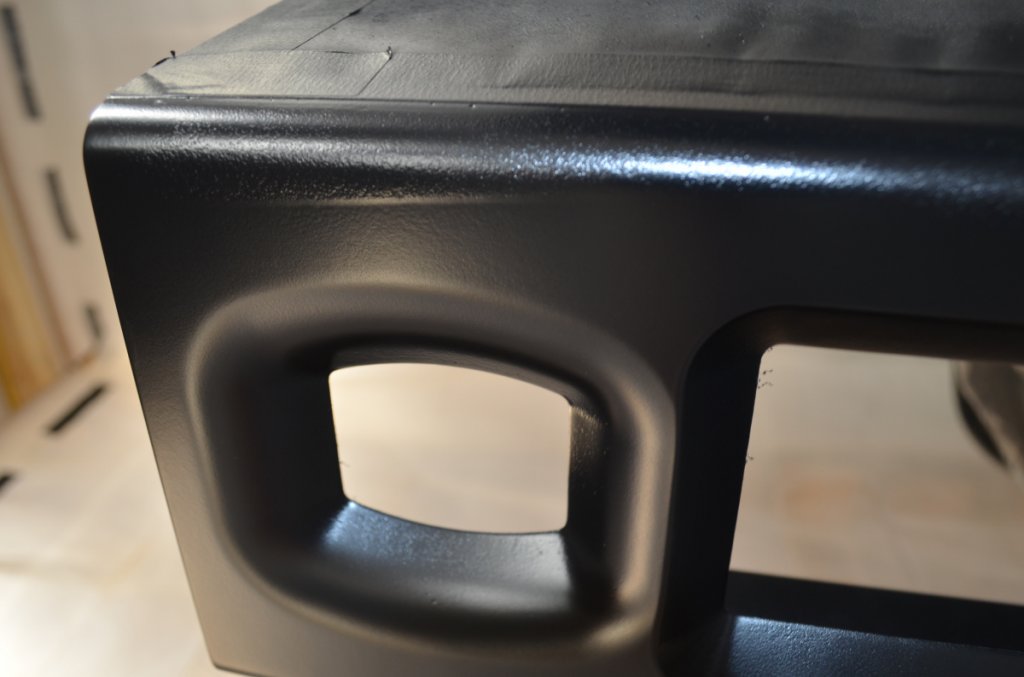
But up close you can see some sags at the top edge of the baffle on this one.  It happened when I sprayed the top edge of the baffle from the rear--some of the paint seeped over the edge:


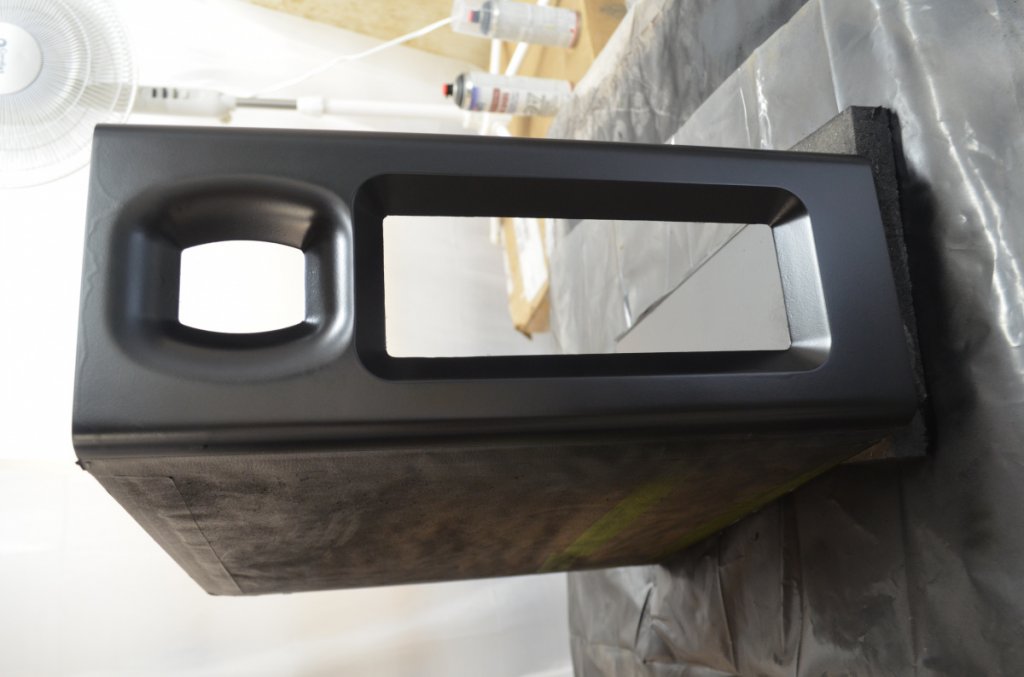
And on the other Mini, a sag near the right edge of the baffle and orange peel on the rounded edge of the baffle:


I'm sure Lloyd will tell me it was just too much paint. These coats were applied Tuesday afternoon.  The paint needs to cure a few days before the mistakes can be sanded away.  I'll do that tomorrow and respray with the final coat in the afternoon.  One of the most frustrating things about this process is waiting for the right weather to be able to spray.  I need temperatures between 65-80 degrees with 40-60% humidity.  We just don't get that many days like that in Ann Arbor.  If I don't get this done tomorrow, who knows when I'll have another chance.  If we don't have an Indian Summer, it could be next May!

The Wings or sides of the Super Mini will be covered with a highly figured mahogany colored veneer, pomelle Sapele.  I want to finish it with a super-high gloss to contrast with the low gloss baffle and edges.  Lloyd has me fixed up with an epoxy spray that looks great, but because I'm running out of good weather, I may need a Plan B.  I made the decision to paint first and veneer later.  We'll see if that was a good decision or not....


Tyson

  • Full Member
  • Posts: 11112
  • Audio - It's all a big fake.
Re: Finishing the Super Mini
« Reply #1 on: 5 Oct 2023, 08:42 pm »
Nice work so far! 

If it's too cold, you could always get a space heater to get the temp up in the space near the speakers.

nlitworld

  • Full Member
  • Posts: 1993
  • Strange things are afoot at the Circle K
Re: Finishing the Super Mini
« Reply #2 on: 5 Oct 2023, 09:48 pm »
Mark those are looking good. And for a first timer, those little oopsies are understandable and better than I've seen even some "professionals" when spraying speakers. All in all, keep at it and they'll be fancy and all finished before you know it. If the weather turns gross too quickly, just let me know and we'll sort through plan b options.  :thumb:

mzbrahce

  • Jr. Member
  • Posts: 75
Re: Finishing the Super Mini
« Reply #3 on: 22 Nov 2023, 07:42 pm »
The second application of Spraymax Hotrod Black went well, much better than the first try.


While the paint cured I started work on the crossovers.  Because they will be visible front and center on the open side of the speaker I want them to look good.  As the Super Minis are mirror image, I decided to do likewise with the crossovers.  I shaped the boards to echo the shape of the base of the speaker and covered them with the same pomelle Sapele veneer that will be used for sides of the speakers.  I used this as an opportunity to try the HeatLock veneer glue that I want to use on the rest of the veneer work.  It worked well except that the water based glue curled this veneer rather badly as it dried which resulted in a few cracks.  HeatLock instructions say that if this is a problem, a veneer softener should be used.  I ordered some before applying veneer to the backs of the boards.  The veneer softener also worked well, although not perfectly--a few minor cracks.  I used the more cracked sides of the boards as bottoms.


After deciding on the layout of the crossover components I made a drilling guide/template for all the holes needed for mounting the components and securing them with cable ties and holes for mounting the board to the bottom of the speaker.  I decided to direct the leads of all the components down through the board, like they would be mounted on a PC board, and do all of the point to point wiring on the bottom side.  Before drilling, I made a sandwich of template, crossover board, second crossover board upside down (the mirror image one) and backer board, to reduce tear-out around the drill holes.


I decided to finish the boards with something I haven't used before, Odie's Oil.  I thought it might be a good way to finish the Super Mini's because a simple rub-on finish would make it less likely that I would screw up the boundary line between the veneer covered sides and the painted baffle.  I followed instructions and applied 2 coats of Odie's Oil and one coat of Odie's Wax.  You can see the raw veneer to the left of the boards.

Also I constructed two pieces of wood with veneer faces for mounting tube connectors, which can be seen at the back of the following photo.  The edges of these pieces and the boards are dyed black.


Here are the completed boards.  The four loops at the front of the boards are where the speaker leads will be attached (one pair is obscured by the inductor).


And the bottoms.


KTS

Re: Finishing the Super Mini
« Reply #4 on: 22 Nov 2023, 09:52 pm »
Very nice work! I will be interested in hearing your listening impressions when you get them burned in.

mkrawcz

  • Full Member
  • Posts: 491
Re: Finishing the Super Mini
« Reply #5 on: 22 Nov 2023, 10:28 pm »
Good stuff right there. As soon as I get my baffles, I will be sending one to Danny fitted with the new Radian midrange driver for him to measure. It will be interesting.

HAL

  • Industry Contributor
  • Posts: 5211
Re: Finishing the Super Mini
« Reply #6 on: 22 Nov 2023, 10:48 pm »
The LM10n fits. 

He will need to rework the crossover.


mkane

  • Full Member
  • Posts: 488
Re: Finishing the Super Mini
« Reply #7 on: 22 Nov 2023, 10:49 pm »
^^^^I'm interested in how they fit the cutouts.<< never mind that.^^^

HAL

  • Industry Contributor
  • Posts: 5211
Re: Finishing the Super Mini
« Reply #8 on: 22 Nov 2023, 10:50 pm »
They drop in to the original cutouts for my flatpacks from Jay.

nlitworld

  • Full Member
  • Posts: 1993
  • Strange things are afoot at the Circle K
Re: Finishing the Super Mini
« Reply #9 on: 23 Nov 2023, 01:36 am »
Those are looking real good. Second time around seemed to do you well. We always joke in the paint world, worst case scenario sand it down and do it again. Those look great though, and the crossover boards are just gorgeous! That is going to be a great looking (and sounding) speaker when you're done. :beer:

mzbrahce

  • Jr. Member
  • Posts: 75
Re: Finishing the Super Mini
« Reply #10 on: 29 Nov 2023, 10:02 pm »
Next, veneer.
The SuperSoft veneer softener instructions say that for best results, once saturated and allowed to drip dry, the veneer should be placed in a vacuum veneer press, between layers of paper towel, until dry.  I used 2 layers of paper towel on the bottom and top of the veneer and pressed it between two platens for 24 hours.  After 6 hours I replaced the wet paper towels with dry.


I let the veneer dry an additional hour or two after removing it from the press before taping it down to a piece of corrugated cardboard and spreading on the HeatLock glue with a roller.  I spread glue on the mdf substrate at the same time.  It took about 90 minutes for the glue to dry clear. 


I then used a utility knife to cut away the veneer piece and applied it to the small side of the Mini.  It was tacky enough to be able to position it correctly and press it down in place, flattening it as I moved from the center out and down.  It stayed in place nicely as I ironed it on permanently, paying special attention to all edges and moving with the grain, not across it.  You can see that the glue, while drying, still created ripples in the veneer.  In some cases these ripples resulted in cracks in the veneer as it dried.

The next photo shows one of the large veneer pieces with the glue still wet.


Before attaching the veneer, I prepared the juncture of the side and baffle.  I placed a piece of green masking tape very carefully straight down the edge of the painted baffle so it was attached to the baffle leaving just a thin pencil line thickness of black baffle paint showing along the back edge.  Just as carefully, I placed another strip of blue masking tape exactly over the first piece, and made sure both ends of the tape stuck above the top edge and below the bottom edge of the baffle.  You can see the top and bottom ends of the blue tape on the left side of the veneer.


After ironing on the veneer I let it cool and dry for about 30 minutes before trimming away the excess veneer from the top and bottom edges, and the back.  Next, to finish the front edge I placed a straightedge on the veneer side of the side/baffle junction, just a blade width from the back edge of the tape and clamped it in position.  I used 3-4 gentle and careful cuts along the straightedge with a new blade in the utility knife to cut through the veneer, and with the straightedge still in place pulled the front scrap piece of veneer away, using the blue masking tape.  This resulted in a straight clean cut, with no bare mdf showing.


mzbrahce

  • Jr. Member
  • Posts: 75
Re: Finishing the Super Mini
« Reply #11 on: 8 Dec 2023, 03:26 am »
I took advantage of an unexpected warm spell and sprayed 2 coats of Spraymax 2k glamour high gloss clear on the Minis on a Monday.  They went on wet and I had a lot of drips.  I waited 2 days for the two part clearcoat to cure, then sanded everything smooth with 1000 grit followed by a rubdown with a 3M gray pad.  I sprayed 3 more coats the following day.  They went on a little too dry, with quite a bit of orange peel.


After sanding down the orange peel, it looks like more coats of clear will be needed to level up the pores in the veneer which are still below the sanded surface (left side is un-sanded, right side is sanded).


There are also cracks in the veneer which are deeper than the pores.  These will have to be filled with epoxy and sanded level with the sanded surface before spraying any more coats of clear.

The following photo shows why I decided not to use Odie's Oil and Odie's Wax to finish the Minis.  After a few weeks of applying the Odie finish to the crossover boards they look dull and dingy, with all of the shimmer muted, when compared to the Spraymax coated Mini side panel.


It will probably be a long wait before the Minis can be finished.  I'll resurrect this thread when the spraying resumes.
Meanwhile I'll start work on the pair of Double Troubles which will be the stands for the Minis.  The plan is to make the outer 3/4 inch thick side panels out of 1.5 inch wide strips of curly maple glued together separated by 1/8 inch pin strips of mahogany, which is the same color as the pomelle sapele sides of the Mini.  The inside 3/4 inch layer will be baltic birch plywood.  The top will be a slab of green granite.


mkane

  • Full Member
  • Posts: 488
Re: Finishing the Super Mini
« Reply #12 on: 8 Dec 2023, 10:19 pm »
Your patience is to be admired.

mzbrahce

  • Jr. Member
  • Posts: 75
Re: Finishing the Super Mini
« Reply #13 on: 9 Dec 2023, 04:04 pm »
Well, I try to enjoy the journey, and the sweet period of anticipation.
Plus, I've got OB-5's and A/V-1's to keep me satisfied while I wait.  Even the A/V-1s, which are 10 years old and have the older G-2 tweeter, and were Danny's least expensive speaker, keep me smiling!  They play in the basement shop, paired with a Bucket Sub and, in my opinion, sound better than anything by Paradigm or B&W, etc.
And, at the speed I work, it will take me a while to build the Double Troubles....

Spschmitt53

  • Jr. Member
  • Posts: 7
Re: Finishing the Super Mini
« Reply #14 on: 17 Dec 2023, 02:18 pm »
Hi All, Merry Christmas! Does anyone have a flat pack of the Super Mini’ s they would like to sell? I know Danny or Hobbs said they are trying out a few planar mids and mentioned the Radian . I think this would be a great speaker to bring back for small listening room application with using a pair of subs. I have the NX Studios which are awesome but I think having the addition of open baffle mid would be a step up. Or if anyone has a functioning pair of Super Minis can comment on comparing to the NX Studios. Thanks much!

HAL

  • Industry Contributor
  • Posts: 5211
Re: Finishing the Super Mini
« Reply #15 on: 17 Dec 2023, 02:39 pm »
Talk to captainhemo.  He may have Super Mini flat packs available.  You can msg him here.

mzbrahce

  • Jr. Member
  • Posts: 75
Re: Finishing the Super Mini
« Reply #16 on: 17 Dec 2023, 03:05 pm »
Yes, check with Jay.  A year ago he had 2 baffles, 2 short sides (wings) and 1 base.  Pretty easy to make the large sides and another base--straight cuts, no routing.  The machined baffles would be very difficult to reproduce by hand.

mzbrahce

  • Jr. Member
  • Posts: 75
Re: Finishing the Super Mini
« Reply #17 on: 18 Dec 2023, 06:48 pm »
It was 55 degrees here last Friday, so I was able to spray on 3 more coats, relatively heavy with a few drips/sags, but I did get a lot of material on.  It will still take at least one more session to get the depth I need.  Before I started the next round of sanding I removed all of the masking so I can redo it all.  I took the opportunity to get an idea of what they will look like when completed.


Happy Holidays everyone!

jmimac351

  • Full Member
  • Posts: 335
  • Chief Instructor - ChinTrackDays.com
Re: Finishing the Super Mini
« Reply #18 on: 19 Dec 2023, 12:52 am »
Those look like you stole the dashboard out of a Rolls-Royce! (That is meant as a compliment)  :thumb:

rinzzlr

Re: Finishing the Super Mini
« Reply #19 on: 19 Dec 2023, 01:28 am »
You’re making me want to build a pair.