X-SLS Amateur Build

0 Members and 1 Guest are viewing this topic. Read 12411 times.

Tyson

  • Full Member
  • Posts: 11112
  • Audio - It's all a big fake.
Re: X-SLS Amateur Build
« Reply #40 on: 25 Jun 2023, 08:31 pm »
There are indeed different grades of MDF.  And softness/firmness is one of the things that differentiate them.  If the MDF is too soft, then you have to be careful with the spikes because if they aren't anchored deeply enough, the torque from moving the speaker around can rip out the feet from the bottom of the speaker.  At least that was try of my Super 7's.  I think the Super 7's are heavier than the X-SLS, so maybe that made them more vulnerable to the spikes shearing out, but something to keep an eye out for.

jonsk2514

Re: X-SLS Amateur Build
« Reply #41 on: 26 Jul 2023, 10:17 pm »
There are indeed different grades of MDF.  And softness/firmness is one of  :thumb:the things that differentiate them.  If the MDF is too soft, then you have to be careful with the spikes because if they aren't anchored deeply enough, the torque from moving the speaker around can rip out the feet from the bottom of the speaker.  At least that was try of my Super 7's.  I think the Super 7's are heavier than the X-SLS, so maybe that made them more vulnerable to the spikes shearing out, but something to keep an eye out for.

Good point and something I have been concerned with when tightening the screws holding the drivers in place.

I am hoping to avoid that “spike” problem by mounting a 3/4” plywood base to the bottom of the cabinet and then mounting the stand-offs in that.  I can’t use spikes on my floors so I will be using knob with a 1/4” threaded rod and a nylon acorn nut on the end.  This is what I used on the MTMs with success so far. 

corndog71

  • Full Member
  • Posts: 1672
  • Some people call me Rob.
Re: X-SLS Amateur Build
« Reply #42 on: 27 Jul 2023, 12:57 am »
I had the same problem with my X-Statiks.  This was my solution.


jonsk2514

Re: X-SLS Amateur Build
« Reply #43 on: 27 Jul 2023, 01:04 pm »
Yes I am still around and slowly, very slowly, making progress on these speakers…

Sorry for the delays.  I do want to get these done, as I am sure you want to see them done.

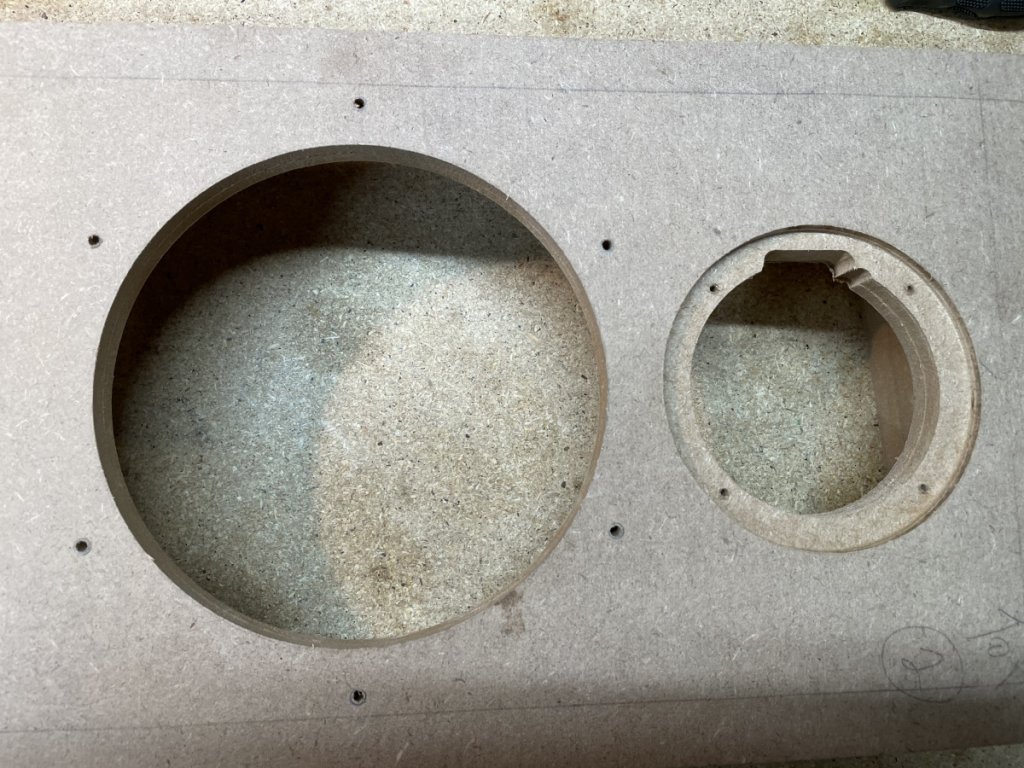
I recently have had a chance to put some time into the next steps.  The first is drilling the mounting holes for the drivers.


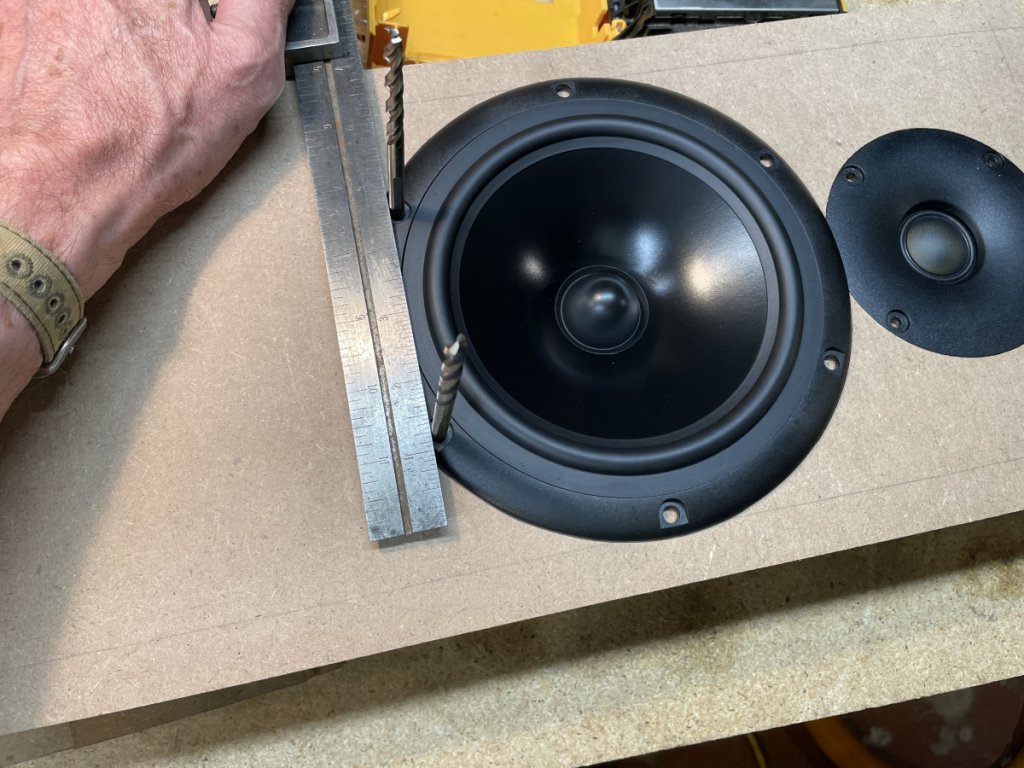
Tilted things, like not having the mounting holes aligned square to the edge of the cabinet would drive me nuts.  So I did my best to square things up.


I needed to get this little step done before moving on to installing the No Rez because I drilled the screw holes on the drill press and the drilling needed to be done without No Rez on the back side.  I am not so good any more at drilling perpendicular holes with a hand held drill.   :?  So, drill press it was.

This speaker takes a lot of little pieces of No Rez.


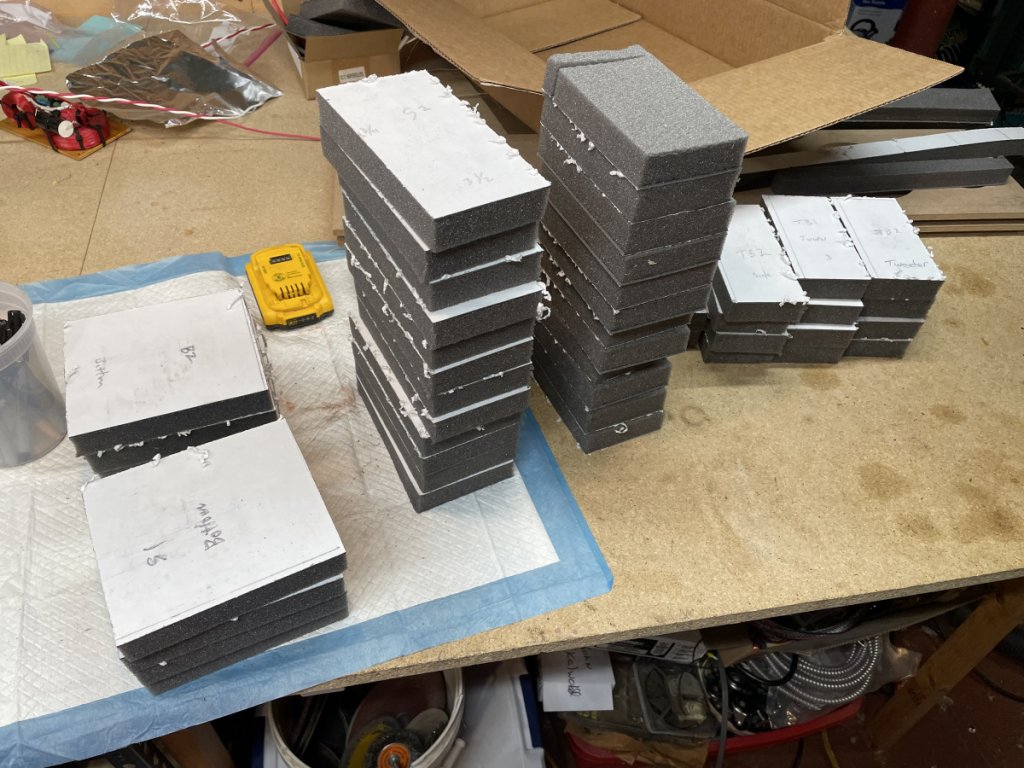
I did all of this cutting on the table saw using a blade that was already heavily used and going dull as the No Rez will dull a good blade.  For cutting small pieces I used a pair of tin snips.   I may have shorted the length of the side pieces a little bit; maybe an inch from ideal.  But the sides of these cabinets seem to have a lot of braces, close together, so I think there will be little in the way of issues from the sides.  As for the amount of foam coverage for acoustics, I would hope that is also not an issue.  I was trying to squeeze these out of sheet of No Rez and I struggle with arranging its dimensions to get larger pieces out of it.  Although I will admit to not trying real hard.  :roll:

I laid out the locations of the braces on the back side of the front panel in order to ensure there is no interfere between the No Rez and the braces.


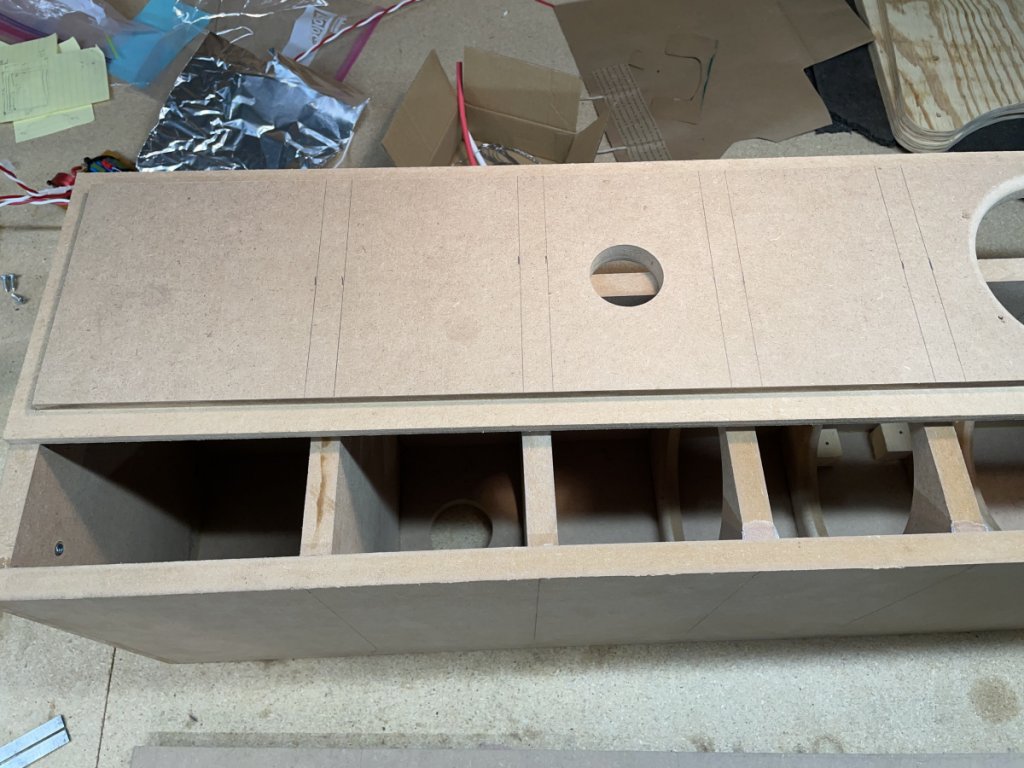
“Dry” fit of the No Rez.  My labeling of each piece was a bit cryptic and I wanted to make sure I had all of the pieces in the right place.  And yes, I will intentionally be covering the holes for port and tube connector to facilitate sanding and finishing.  The driver opening will be covered on the inside with tape.


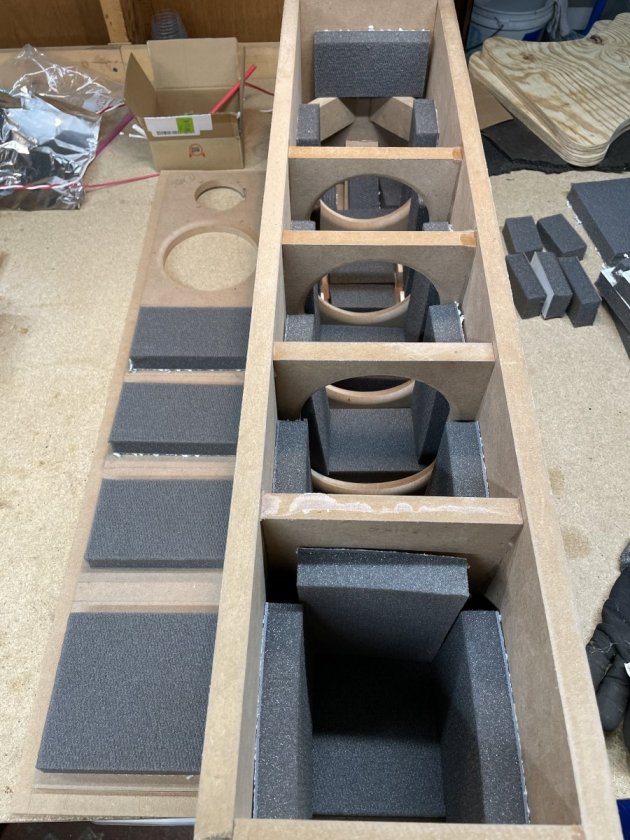
There is a dead air space at the bottom of these speakers (the near end in the picture).  I have read that some builders fill this area with sand.  I suspect others just leave it, and just close it off.  My option is to line 5 of the 6 sides of the space with No Rez to preclude having any resonances.  I don’t know if this could happen, but I figure this can’t hurt.  I am leaving the bottom unlined.  This is where the screws for the stand plate will come up through and I don’t want No Rez there that may be push up and loosened by those screws.

I wiped down the inside of the cabinet with alcohol to remove any dust and whatnot that would interfere with the No Rez sticking to the MDF.  Doing this, I did find a few runs of glue that needed to be remove.  Those would have been an issue with the No Rez sticking.


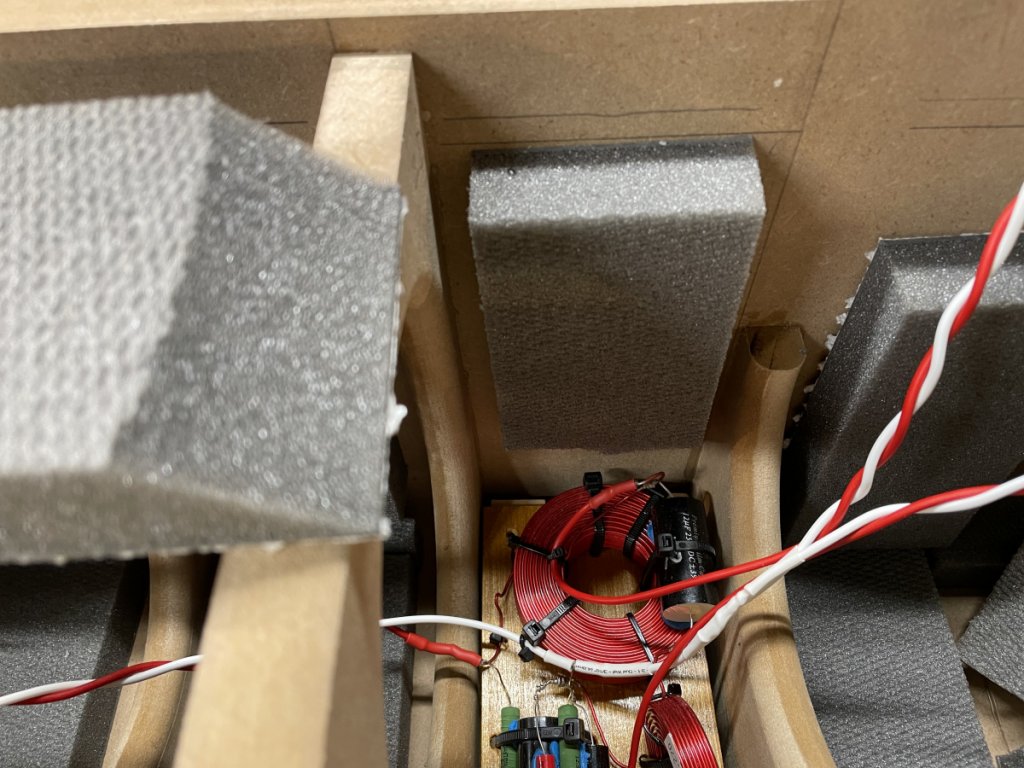
The crossover will be mounted below (behind?) the bass driver and it is a tight fit.  The side pieces of No Rez are cut even shorter than rest and I beveled the foam to facilitate installation of the crossover and its removal later on, should that ever be necessary, which I really hope not.   :nono:

And, yes, I got “peal and stick” happy with the No Rez and put the No Rez on the sides here before installing the crossover…  :duh:  I should have installed the crossover first… Yes… But now I get to find out whether my idea about shaping and shortening the No Rez actually worked…  :roll:

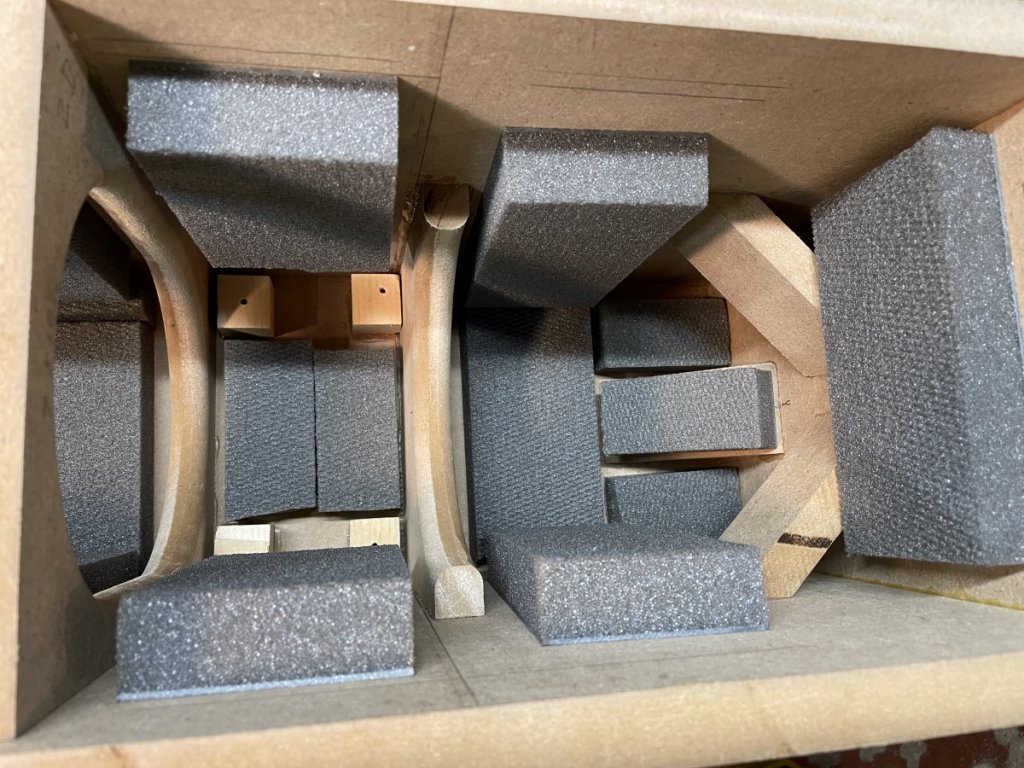
No Rez installed.  Note the little pieces at the top of the area behind the tweeter, in particular the piece on the cross brace from the back to the top.  Danny talks in his videos about possible “reflections” inside the cabinets of some speakers. It seemed to me that this cross brace might be a culprit, especially given that it is aimed back at the woofer, so I covered it….  :D


Making progress… I’ll get there eventually!   :thumb:

jonsk2514

Re: X-SLS Amateur Build
« Reply #44 on: 28 Jul 2023, 12:54 pm »
Before going any further I thought it would be a good idea to check out the crossovers.  I have a very sophisticated setup for dong this.


It doesn’t get much better than this.  An old iPhone with an aux jack, a really ancient amplifier, and a handful of leads with alligator clips.  The base driver makes for a pretty good full range speaker for testing each half of the crossover circuit and to not have to worry about damaging the tweeter driver if it is hooked to the wrong half.

Yes, everything worked as expected.   :thumb:

An interesting phenomenon occurred when doing this.  The crossover was set on top of the amplifier’s steel case and when I hooked up the crossover to the amplifier, with no drivers attached (those wires were waving in the breeze) I could hear music.  At first I thought I was nuts… :scratch:  After listening around to figure out where the sound was coming from, I pinpointed it to the amplifier.  The best I could tell it was not coming from the inside; it was coming from the steel cover on the amplifier. Lifting the crossover up, off the cover made it go away.  The music sound came back when I set it back down on the cover.  I had a piece of sheet steel around and tried setting the crossover on that.  Yup, music.  So, it seems that the music I was playing though the crossover (coil?), alone, was exciting the steel case making it act like a speaker driver.   And it seems that the particular shape, thickness, whatever of that case worked really well for doing this.  Much better than the piece of sheet steel I had.

So, if you ever wondered it Danny was right about the fields coming off the crossover coils (I presume that is what was causing what I was hearing) will interact with things (such as other coils), I think I just accidentally proved that would be true.  I needed to raise the crossover with 2 pieces of MDF to keep this from happening, or at least from me hearing it.

Wow!  Who would have thought that would happen!

Moving on, I was less than thrilled with how the large coil set on the board for the crossover.  It was tight but I found that it would slide a little bit.  I used some mounting putty called Fun Tak to help secure other parts of the crossover assembly (shown in a previous post above) and now I wish I had put some under this coil.  I did my best to push some of this stuff under the coil in several place with the hope of preventing any movement and/or noise.  I doubt it would have made any noise, and I am probably over thinking this, but adding the blue stuff to the underside of the coil makes me feel better.


With that done, I mounted the crossovers into the cabinets.  I noted above that I had put No Rez on the sides in the space where the crossover is located, before installing the crossover.  Now I needed to install the crossover around the No Rez.  I had sized it and trimmed it to facilitate the removal of the crossover if ever needed.  I was not expecting to have to install the crossover past it…. Well here was the test…


I know, it looks just like the previous picture, but it is not.  If you look closely at the left side of the picture, you will see that the crossover board slips nicely past the No Rez.  And I was able to get the screws and screwdriver (with several extensions) past the No Rez and got the crossover neatly mounted  :dance:

For the other cabinet, I installed the No Rez and the crossover in the “right” order.  All is good.   :thumb:

jonsk2514

Re: X-SLS Amateur Build
« Reply #45 on: 8 Aug 2023, 02:22 pm »
Glueing the fronts on.  This starts with taping over the driver openings on the inside of the panel.


And this time I laid out where the braces are so the tape is not caught between a brace and front, making it hard to remove, if nothing else.

Taping over the driver openings and covering the other opening with the No-Rez facilitates routing, sanding and finishing the cabinets.

I use 2 kinds of glue for this.  I use the TiteBond Original on the rabbited part around the outer edge of the front panel where it meets up with the sides, top and bottom.  I laid out on the back side of the front panel as to where it meets up with each of the braces.  For here I used Titebond Quick and Thick.  This glue will fill small gaps which exists here as the braces are cut slightly short in order to ensure that the front sits flush with the sides, top and bottom.

There are never enough clamps.


 :lol:

I didn’t bother with side to side clamps as the braces support the sides and will (hopefully) preclude any unwanted bowing of the sides.

You will notice that the cabinet is flipped over so it is resting on the front panel, on blocks.  This was done so there are no glue runs down the sides in the inside the cabinet and most importantly, IMHO, so the Quick and Thick glue does not run out from between the braces and front.

Along with clamps, there is never enough glue….


 :lol:  :lol:  :lol:

jonsk2514

Re: X-SLS Amateur Build
« Reply #46 on: 15 Aug 2023, 09:52 pm »
I forgot to post a picture of the glue on the backside of the front panel.  I had laid out the location of the braces so I could put the glue in the right area.


the yellowish glue around the perimeter is the Titebond Original.  The white glue is the Titebond Quick and thick.  As I noted above this glue will fill small gaps, which likely exist between the braces and the front.  I did find that the glue around the perimeter did swell the MDF slightly, making it difficult to put the front panel into place in the cabinet.  A little excess glue did well to kept it from setting up too quickly as a lot of clamps and time were needed to draw the front into the rest of the cabinet, without risking damage in the thin areas either side of the bass driver opening or elsewhere.

Once the glue fully setup, I rounded the corners with a 1/2”  quarter round bit on the router.


I started with using a straight edge guide to ensure the router runoff was straight.  Then I found that it cold be done by eye.  Mostly I wanted to ensure that the edge running into the bottom remained square.

It didn’t take long to get the corners rounded on both cabinets.


Yes, I did blow the big bucks on the Dewalt dust collection system hose with the unique Dewalt fittings that fit the dust collection outlet on the sander.  It worked and made for pretty much dust free sanding.  The palm sander is a 20v cordless random orbit one from Dewalt.  Works well with a 5 A-Hr battery.  Given the hardness of the MDF, at least on the surfaces, I used 80 grit sandpaper.  A 3M sponge sanding pad was used for detailing the rounded corners.


Interesting that the Dewalt dust collection system does not work on the router.   :dunno:  This is where it would be helpful. But Dewalt made sure it is not… :bawl:  I was able to cob together a working dust collection system for that tool.

I am taking a different tactic to get the finish I have been using.  As with my previous speaker builds I am using MINI Wax stain (red mahogany 225) and poly, both in oil base. In the build of the X-LS and X-CS speakers, I found that I needed to use their preconditioner before staining the MDF.  This is now recommended on the can of stain.  What I didn’t do back then (didn’t read the instructions fully) was to apply the stain less than 2 hrs after the application of the preconditioner.  I did that this time, but must say I am not seeming any difference.  I suspect that this might have something to do with the MDF and how porous it is.

The second thing that I am doing differently is that I am using a small 4” roller to create the finish.  So far, so good.  I’ll let you know how this progresses.   :thumb:

I will also note, as I noted before, that the MDF I got for this build is clearly a lower quality.  While the surfaces are hard, like before, the interior seems to be softer and less solidly packed.  This has made routing the corners, sanding and staining more difficult.  I am sure I can get around it, but it is going to take some effort to figure out how.  So far, using a roller might be helpful.  More to let you know about as this progresses.

Glady86

  • Jr. Member
  • Posts: 136
Re: X-SLS Amateur Build
« Reply #47 on: 16 Aug 2023, 09:30 am »
You have very good wood working skills. If I had all the necessary equipment, Id try to build cabinets. That material looks like what I call partical board, a bit different than MDF. It's harder and has more coarse particles.

jonsk2514

Re: X-SLS Amateur Build
« Reply #48 on: 16 Aug 2023, 11:23 am »
You have very good wood working skills. If I had all the necessary equipment, Id try to build cabinets. That material looks like what I call partical board, a bit different than MDF. It's harder and has more coarse particles.

Thanks.

I am very familiar with particle board.  The material I am using was labeled as MDF and is definitely MDF.  Just a lower grade than what I have used before.   I don’t remember if it is the same manufacturer as I have gotten in the past, but quality from the big box store I got it from has dropped in the past couple of years, since my last build.

As for building these or any of Danny’s designs, there are cabinet flat packs (see the GR Research web page) you can buy and assemble yourself.  You don’t need much in the way of skill.  Just glue and clamp.  You can paint them for a finish.  Start with the X-LS which should be the easiest.

jonsk2514

Re: X-SLS Amateur Build
« Reply #49 on: 13 Sep 2023, 08:21 pm »
The finish on these cabinets has been a “process” to say the least.  I have been working on this, on and off, since my last post.  The problem has been none of my past experience applies here and I have struggled to figure out why and how to fix it.

I am doing the exact same finish style as I have done on my 3 previous builds.  The finish is a built up stain, where I apply stain, let it dry then apply additional coats of stain, drying between each coat until I get the color and look I want.  Then I apply several coats of poly varnish, sanding/steel wooling between coats.  All of products have been Minwax brand.  The X-MTMs were done in about 2 weeks.  Everything worked well there.  The X-LS and the X-CS took a bit longer.  For those speakers, I figured out that the formula for the stain changed so it was more difficult to build it up, but I managed in a timely manner.  But these speakers that I am building now are a whole different story altogether.  Nothing that I did on those other builds worked well here.

Not only am I dealing with the change in the formula of the stain, which makes it harder to build it up.  I am dealing with what I think is poorer quality MDF than I used before.  This stuff is like a sponge.  I put stain on and it disappears into the MDF.  Same with the next coat and the next.  It didn’t want to build up at all.  With the X-LS build I had success with the pre-stain conditioner.  Not here; it did nothing to help.

The first coat of stain…


 :?

Second coat…


A little better, but not great.

After a few more coats it started to build up on the face of the MDF.  But there was no way to get it to build up on the end grain (ie: at the round-overs)

For better or worse I applied the stain with a Purdy 4” mini roller.  Coverage was excellent but finish was horrible.


As an experiment, I tried sanding it with a 3M sponge sanding block that had been dipped in paint thinner.  Go figure it worked like a charm!  :thumb:


And there was a bonus - the now gooey stain on the sanding block filled in the end grain without soaking in.
 :dance:
The down side of all of this has been time.  A long time elapsed waiting for the stain to dry.  Several weeks between sanding and adding more stain and sanding.

The end result of the stain build up was pretty good, like the picture above shows.  Unacceptable was the dry time…. Something to work on in my next (?) build.   

And it is time for the varnish to go on…


Still using the roller with a very, very short nap.  I would not recommend this for anyone looking to get a piano like finish.  That is not happening.  Even on the package for the rollers it says “mostly lint free”  :icon_surprised: Yah, no.  Not the best.

However, the coverage with the roller is excellent.  With a brush or rag I was getting runs and sagging in the varnish.  It was really hard to apply a consistently thin coat.  First try with the roller was pretty good in this respect.

Now, on to the lint issue….   :scratch:

KTS

Re: X-SLS Amateur Build
« Reply #50 on: 13 Sep 2023, 11:19 pm »
I had an issue similar to yours, but not on a speaker cabinet. The issue was the stain reactivated the glue catalyst in the MDF. I used japan dryer in my sand and seal to stop the process. If you do use japan dryer (helps oil based finishes dry faster) use it per the instructions, it will crack the top coat of finish if you mix too much in. Nice build! I am assuming you are using oil based products since you are using steel wool between coats. If you are using a waterborne stain and polyurethane, disregard what I recommend above.

Kelly,

jonsk2514

Re: X-SLS Amateur Build
« Reply #51 on: 14 Sep 2023, 09:19 pm »
Kelly - Thanks for the info.  Yes, all of my finishing materials are oil based.  I may be running into a bit of your issue too.  The stain seemed to raise a bit of the surface making it a little fuzzy.  I was wondering about the japan dryer, but never got to more than just thinking about it as my main issue resolved itself when I sanded things.  The other thought that I had was to add just a bit of varnish into the stain just to make things to setup a bit better.  Don’t know; just I thought I had. 

As it is, right now I have applied my second coat of varnish with the roller.  I sanded the first coat with the extra fine version of the 3M sponge blocks I have.  The second coat of varnish still came out with some lint in it.  I was surprised at that as that was the second coat using that roller and I would have thought the lint would have been out of it.  For now it is not an issue as I am just using the roller to build up the varnish and the lint is coming out with the sanding.  It will be the last coat or 2 where I will need to do something different.  For now the roller gives me a quick and easy method to lay on coats that are even and thin enough to not run or sag.  2 or 3 more roller coats then a finish coat or 2.  The varnish is drying pretty quickly, so this should go pretty quickly. 

That is, as long as I don’t splash any more cleanup paint thinner on a freshly varnished cabinet with a errant roller that decided to go on a high speed flyby into the used paint thinner catch container… :duh:  Makes for a great fish eyes in newly laid on varnish.   :cuss:  It may not be too bad (famous last words).  I’ll let you know how I made out with wiping it all down with a thinner soaked rag.  Didn’t look too bad.  Tomorrow will tell.   :roll:

jonsk2514

Re: X-SLS Amateur Build
« Reply #52 on: 18 Sep 2023, 09:10 pm »
Well, “tomorrow” was more than just a few days with other things going on.  But on the good news front, the splash created little in the way of ill effects.  The finish dried nicely, although a little rough.  This was easily sanded and another coat of varnish has been added.

I am still dealing with the lint issue.  Not sure how to address it.  Yup, don’t use the roller.  That would probably be the best option.  I may try an hybrid solution (well, potential solution).  That is, roll the varnish on to get an even coat, which was hard to do with the brush.  Then brush out the rolled on varnish to remove the lint.    :scratch:  I wonder.  Won’t hurt to try.

These may just have an excellent 5 foot finish… :wink:

jonsk2514

Re: X-SLS Amateur Build
« Reply #53 on: 24 Sep 2023, 07:11 pm »
The ugly, the bad, the good.

More layers with the roller.  The lint issue got better, but never got to be great.  Still a lot to deal with.  Then there was the resulting “Alligator” finish…


This was actually worse than it looks; this had real depth to it and took a while of sanding to remove it.  The finish is MinWax semigloss.  It is likely that the “semigloss” is the culprit here.  But I am stuck with it as that is what I used in my previous speaker builds and I want them to all match.   I did find that the latest version of the 3M sandpaper is worth the money.  The grit is very uniform and doesn’t have bits of “large” grit that leaves scratches and it cuts nicely.  Sanding started with 320 grit, followed by 400 grit then 800.  This got rid of both the alligator finish and the lint uglies. 

Next was how to stop the alligator skin from forming.  I still wanted to use the roller to develop some thickness to the varnish.  But this introduced a lot of bubbles in the varnish as it was being laid on.  It was these bubbles that seemed to be causing the alligator finish.  On a whim I took a wide brush, dampened it with paint thinner and brushed over the still wet finish, popping those bubbles.  It worked.  Note however that this varnish starts to set up quickly, so I would roll varnish onto one face at a time and brush that out before moving to the next face.  Otherwise the brush would leave brush marks in the finish that didn’t level out with drying.

For the final finish I went back to the tried and true, lint free, rag for the application of the varnish.  The previous layer was let to dry for 24 hrs after which I wet sanded it with the 800 grit paper wetted with mineral spirits.  This all got wiped with paper towels wetted with mineral spirits.  Then I laid on a thin, but not real thin, coat of varnish with the rag, wiping the full length of the cabinet with each application.  A continuous coat seems to be important with this varnish as it does not blend well at stops and starts otherwise..

I am pleased with the end results.  I know there are others who have created much more professional finish than this (pretty spectacular, actually), but these are good enough.


So close to being done…  :dance:

These will sit for a day or so to let the finish fully dry.  Then drivers will go in and the base will go on.

And that will be it.    :thumb:

jonsk2514

Re: X-SLS Amateur Build
« Reply #54 on: 11 Oct 2023, 02:04 pm »
And…

They are done


Lined up with one of the X-MTMs I built a while back.  These will be the back channels for my home theater system, clearly not hooked up yet.  So, the MTMs are the front left and right channels, and are doing double duty as the bass channel.  There is a X-CS for the center channels and these complete the system, at least for now.  Not sure if there is a subwoofer in the system’s future or not.  We’ll see.  As for hooking up the X-SLS speakers, I need to upgrade my receiver to be compatible with the HDMI output of my stream service.  So it may be a while before I get to listen to them, although I already know how they are going to sound… Nothing short of fantastic, I am sure.

I do want to give a shout out to Danny and crew for how they package and pack the drivers.  The drivers for these came packaged and packed better than all of the last sets I received, not that there was anything particularly wrong with those, these were just a lot better.  I especially liked the plastic shields over the front of the drivers.


These served a dual purpose by providing protection to the driver will soldering the wires on.

Some of the packing material for the tweeter also made for a great stand for the tweeter to facilitate tinning the connectors.


As I noted before the openings for the port and binding post were cover by the No-Rez.  I used a rotozip tool to cut these out.


And, yes, binding posts.  These have had all of the steel parts replace, so not the worst of the possible connections.


The base is the same form as what I used on the MTMs.  I have found that these provide a lot of stable and the adjustable feet make it easy to level the speakers on the maybe not so level floors in my old house.  I added a layer of self stick felt to the bottom of the speaker to preclude any noise from being generated between the speaker and the stand.


I think that is that.  Thanks for following along and bearing with me for what must seemed to have been an eternity.   :thumb:

oskar

  • Full Member
  • Posts: 394
Re: X-SLS Amateur Build
« Reply #55 on: 11 Oct 2023, 03:11 pm »
We all love build threads. And it's interesting to see how everyone has their own way of doing things.
You need to get those babies fired up. Thanks for sharing.

Tyson

  • Full Member
  • Posts: 11112
  • Audio - It's all a big fake.
Re: X-SLS Amateur Build
« Reply #56 on: 11 Oct 2023, 05:58 pm »
Man, those are some pretty premium rear surrounds! 

And super detailed build threads like this one are extremely helpful for the community here.  Thank you!

jonsk2514

Re: X-SLS Amateur Build
« Reply #57 on: 12 Oct 2023, 12:22 pm »
You’re welcome!

And, yes, I do need to get them up and running. Premium sound in the rear to go with to go along with what’s up front …  :green:

This community has been pretty amazing with their threads and advice.  I got a lot of good ideas on how to do these assemblies from those threads.  Hopefully, sharing what I have done, mixed with what others have shared will get others through their builds.  :thumb:

daopi

  • Jr. Member
  • Posts: 7
Re: X-SLS Amateur Build
« Reply #58 on: 14 Nov 2023, 01:42 am »
Thank you for so many details! MDF seems weird to me how I can achieve good finish without veneering. Plus I never really used a router but looking forward to build something now!


jonsk2514

Re: X-SLS Amateur Build
« Reply #59 on: 4 Dec 2023, 08:24 pm »
My poor speakers….  :o

We acquired a couple of kittens…   :no_speak:


The X-MTMs have become cat perches, as have the X-SLS speakers.   :shake:

With cats, they go where they want to go.  So the thought would be to protect the speakers.  No, the other option is not viable, if you know what I mean. :wink:  Mostly at this point I am interested in protecting the cabinet finish.  I recently discovered KYDEX, a heat softening, moldable plastic from which I made some covers for the tops of the speakers.


Fitted to the X-SLS speaker


My plan is to fix these in place with some Fun Tak mounting putty


I am not sure if I will need some driver covers or not.  So far the cats have not really bothered them.  Nor have they show an inclination to leap up on top from the floor across the front of the speakers.  I wouldn’t put something made of cloth in front of the driver, as that might just encourage them to scratch at it.  More to come, if I figure something out.