Hi all! I'm new and building an integrated amp out of SOLID ALUMINUM :-)

0 Members and 1 Guest are viewing this topic. Read 6020 times.

Pjotter

  • Jr. Member
  • Posts: 44
  • Aluminum + Audio = Magic :-)
Hello everybody!

I'm Peter, live in the Netherlands and i'm in the process of making/upgrading a ChipAmp.
This integrated amp has 4 inputs, and 68W into 4 Ohms and 38W into 8 Ohms (LM3886).

I've spend quite a lot of time to get the best possible sound out of these chips, I've had help from others and read and tested so many ideas and configurations. it's definitely not according the datasheets provided by Texas Instruments but the sound is trully amazing.

The bass is so deep, so pure. The voices are so real and vivid. The guitars and drums are really standing in front of you.
It's just amazing. People owning 10k+ systems told me this simply sounds at least as good.
So that's pretty cool, and i'm pretty proud of the result.

But this is just the electrical part of the whole story.

I need a case around this amplifier... I'm a CNC machinist and therefore i'm not going to buy a $90,- case. I rather get a $90,- $400,- chunk of aluminum to start with and mill my whole case out of it.
The raw material turned out to be way more expensive than expected!  :duh:

I hope you guys (and girls for that matter) like to see the progress of this. I didn't came to brag here, just want to inspire others and hopefully you'll enjoy watching me make this thing

Wires! Ticking time bomb! This is what it looked like during my tests. How it still looks actually...


This is how it's going to look (hopefully)


Not so long ago something landed on my workbench:


Yup, a bit more than 300x400x100 MM


Need to be able to connect wires and cables somewhere:


Let's make some chips:


The material is just 3MM deep in these vices. It's amazing how rigid and strong it is! Thanks to the teeth we push into the material first.


First setup:


M3 thread inside, no tapping here, only thread milling! I really prefer that over tapping, much more reliable and very smooth thread.


Quickly had it on the 4th axis to make the threaded holes on the side


Final result:


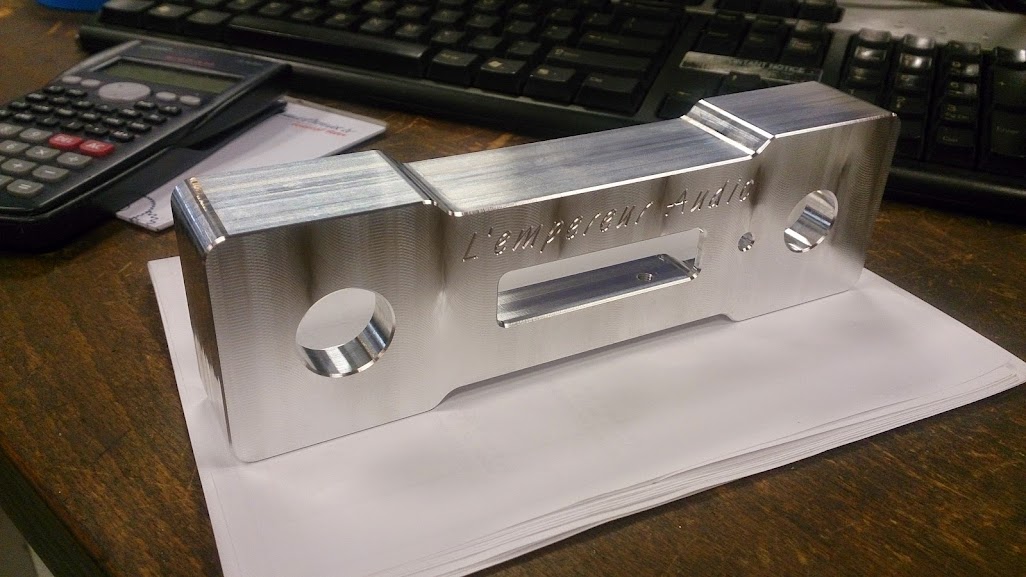
Now i also need some brackets for two PCB's inside the case:


Well, That's it for now. In a few days i'll move along with other parts!

Hope you like to see this coming alive.

- Peter
« Last Edit: 13 Sep 2014, 08:39 pm by Pjotter »

JLM

  • Full Member
  • Posts: 10666
  • The elephant normally IS the room
Welcome!

And nice   :thumb:

What's the rest of your system like?

timind

  • Full Member
  • Posts: 3849
  • permanent vacation
Welcome to Audio Circle.

That is some wonderful work you're doing there. Keep the pics coming as you progress.

pmarun

WoW, Impressive. Please keep the pictures coming.

Good Luck.


poseidonsvoice

  • Full Member
  • Posts: 4016
  • Science is not a democracy - Earl Geddes
    • 2 channel/7 channel setup
GREAT 1st post!  :thumb:

Welcome to AC.

There are a few diy'ers around here and would love to learn from your experience as well  :wink:

Best,
Anand.

Pjotter

  • Jr. Member
  • Posts: 44
  • Aluminum + Audio = Magic :-)
Hi all!

Thanks for the kind replies!

I've made/finished a few more parts, the PCB brackets are now completely finished and i've made the cover plate

I've drilled the holes in the PCB brackets so they can actually be used  :lol:


And the cover plate, it's not really going well this week, it's been late pretty much every night and i've been working on my car as well wich broke down on me  :evil:
I couldn't find the other spacers for the clamps so i made the front side first and than the back side:


When that was done i've put 4 clamps around the plate to press it down:


eventually it came out like this:


It's made of tooling plate, it's aluminum plate that's been milled from both sides and perfectly straight and flat.

For now the planning is that i'll make a start of the big block on saturday, i don't think i'll be able to get it completely finished. I'd be surprised if i did.
But here's an impression of how it's going to be:


You'll hear more soon!

Rob Babcock

  • Volunteer
  • Posts: 9298
Wow! :o  What beautiful work! :D :thumb:

Guy 13


Hi Peter.
Welcome to AC.
For me, it's always enjoyable to see the creation of something
from raw to a beautifully finish product.
Your step by step documentation of your amplifier is really
fun/interesting to watch.
You are a talented person, but then, I guess it's your job, but still:
Talented. :thumb:
I would also be interested in knowing what the amplifier will be driving.
Keep the pictures coming, please don't break the rhythm.

Guy 13

Last year a Dutch guy came to see me on planet Vietnam is name is Edward
and his nick name is bardamu
and he's also Dutch and he's also a machinist.
He is schedule to come back here in December.
Maybe he will comment your work.


TF1216

  • Industry Participant
  • Posts: 1114
I am a big fan of the SolidWorks logo on your rendering.  Beautiful project  :thumb:

Guy 13

Hi Peter.
Forgot to ask you why you choose the French name of
L'empereur for your amplifier?
I am sure you don't speak French, am I right?

Guy 13

Mike Nomad

Uh... Hmmm... Wow.

This is probably the best thread I've ever seen at AC, and hands down, the best initial post I've ever seen.

Very much looking forward to seeing you mill the chassis.

Welcome, Pjotter. I hope you find your stay at Audio Circle enjoyable.

Pjotter

  • Jr. Member
  • Posts: 44
  • Aluminum + Audio = Magic :-)
Thanks for the replies guys !

I'll answer them later ,with new photos, because boy, it's amazing! I'm totally stunned by the result.
And I even see things like this on a daily base!

Super proud

randytsuch

Looking forward to more pics, awesome project.

BTW, seems like this should be in the lab forum, it's a serious DIY project.

Maybe a mod can move it?

Randy

Pjotter

  • Jr. Member
  • Posts: 44
  • Aluminum + Audio = Magic :-)
Hi Guy_13
Thanks a lot for your comment! Loved reading it, thanks for the compliments!
I'd like to hear his comment! Perhaps he's got some great ideas we all can use :-)

I chose the french name not because i speak french, at all. I wanted to put my last name (Keizer) in there somewhere, but i didn't really liked "Keizer Audio" so perhaps "Emperor Audio"? Or "Empire Audio"? But every time i came back to L'empereur audio. This is also what i called my first amplifier about ten years ago when i was 15 Yo.
I've never even wrote down the name "Keizer Audio" but now i do, it looks kind of o.k.

Any native English speaking people with an opinion about that?

Mike Nomad,

Thanks for the comment, it's great and motivating to read, i hope you'll enjoy the pictures that will come here in a few minutes!

Randytsuch
Thanks! Glad everyone is enjoying this project just as much as i do.

Great idea to move the thread, I checked that lab forum and i also think it's a better place.
So if any mod reads this, can you move it? Thanks! :-)

Pjotter

  • Jr. Member
  • Posts: 44
  • Aluminum + Audio = Magic :-)
Here they are: PHOTOGRAPHS!

Today i had the pleasure of using this machine, it's a Haas VM3, my regular machine was occupied so i moved to this one:


Fixed the base plate on the machine bed so the vice can be attached:


And there it is, a little more than 30KG of aluminum:


On the left and right a jackscrew to eliminate any vibration


First setup, facing the top and roughing the corners. Facing was done identical as the front plate, they really match :-)


Milled the outside and roughed the inside:


Finished the sides of the pockets:


Unfortunately i couldn't finish the whole setup, i still need to put some threaded holes and fillets on the edges of the grooves. But asides that it's all finished nicely and i've put a nice subtle chamfer on every edge.


Well, these where the pic's of today..
I'm quite impressed  by the result, eventhough i see pretty products every day, this is really something special. Not because i designed it or i made it, but it was made to be eye candy.
But the best is ahead of us, the top side.

Later i'll post some high-res pictures! Thanks for watching, i hope you enjoyed it!

Pjotter

  • Jr. Member
  • Posts: 44
  • Aluminum + Audio = Magic :-)
Some extra photo's, they're shot with a proper camera instead of my smartphone..


FullRangeMan

  • Facilitator
  • Posts: 20002
  • To whom more was given more will be required.
    • Never go to a psychiatrist, adopt a straycat or dog. On the street they live only two years average.
Wow wonderful photos, alot of work.
The finished pieces looks perfect, congrats.

DaveC113

  • Industry Contributor
  • Posts: 4344
  • ZenWaveAudio.com
Wow, thanks for posting!  :thumb:

AluminatiSound

  • Industry Participant
  • Posts: 485
  • Machining and Audio What A Great Match!
Looks cool man!!

Nice to see another CNC machinist on here making audio art.

Best,
Matt

Folsom

Are you going to post your amp build specs too? Just curious, I gave up on Chipamps, but who knows what yours sounds like compared to mine!

The work here, wow. Plus the aluminum will reduce some low frequency inductance being so close to everything.