Ok. First my idea origins. I purchased a Lenco L-75 on the cheap $800 and it came with a Denon tonearm.
The purchase was a real steal and I can say, from what I can hear, the accolades of the modified of the L-75
are warranted. What I didn't like was the questionable quality of the tonearm. At first setup it was decent
as far I could tell. What was bothering me was the inability to set the geometry of the cartridge as I thought
it needed to be. I'm no technical guru and I know there are varied beliefs on the correct geometry. So I
could try for a different headshell to adjust the cartridge further out to my thoughts of what it should be. The
headshell slots didn't allow me to move the cartridge further. My temporary fix was to super glue the cartridge
the furthest it allowed.
Not happy with scenario, I decided I either needed to buy another tonearm or make my own. That would be
at least $250 for something used. I was thinking of a Rega RB250 which from all accounts was a great match
for the Lenco. That still left me with trying to drill the correct location on the spare arm board I received and
still dealing with the geometry issue. Considering I've spent too much money on my setup already and being
a cheapskate with ideas running around my head I decided to try DIY.
Inspired by the Well Tempered turntables with the arrow shaft for tonearm and golf ball for pivot I decided I
could do something myself but instead a radial tracker. That would allow me to not have to worry about
geometry as much. So here are my thoughts.
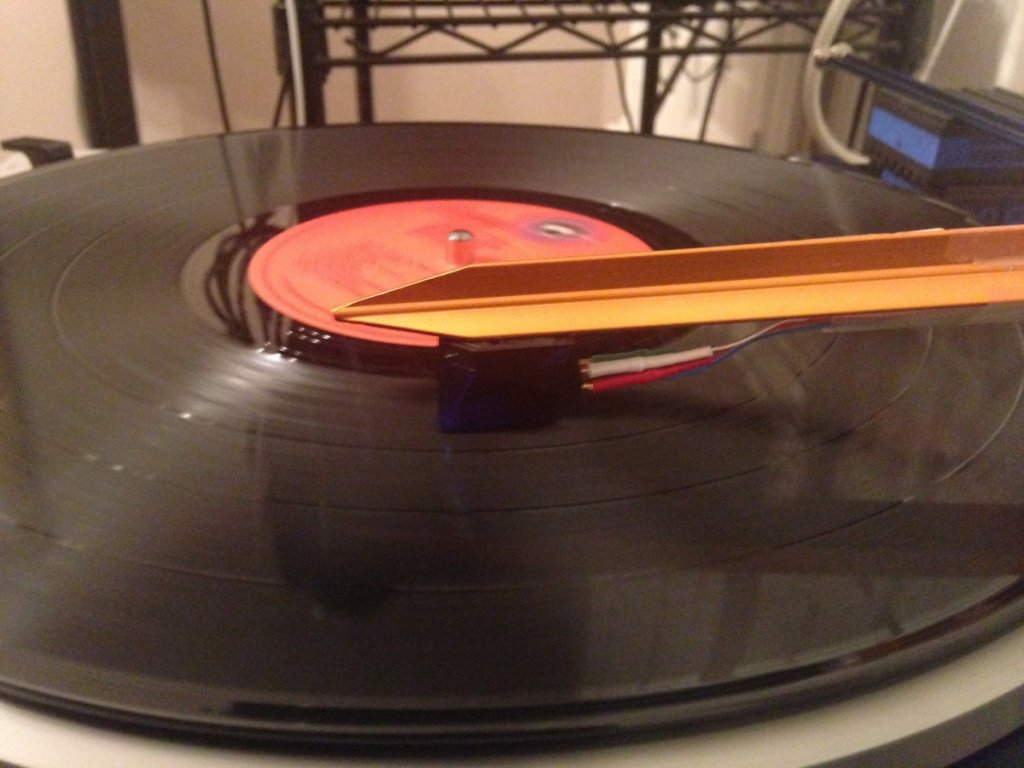
An aluminum tent stake for the tonearm. $1.00 It is a triangular shape. Like the Mercedes Benz emblem. I super
glued an Ortofon Blue the end of it trying to keep it a perpendicular as possible. I purchased set of tonearm
wires with cartridge pins for $22.00. I know it can be done cheaper. I took crochet needles to lay the track for
the arm. I cut the end of some extra cheap interconnect cables to attach to the tonearm cables. The good end
would plug into the preamp. As a read super glue is nothing more than plastic I used it make the solid connection
after twisting the wires. I couldn't get the tonearm attached using super glue to the arm support so I used some
U-glue tabs to make a temporary connection. I U-glued the interconnect cable to the base so it wouldn't put
the tonearm cable wires off or cause a strain on the movement of the arm. I put a thin layer of oil on the rail
to try to help the tonearm slide across. The counter weight was left over from a Project arm I removed from a
previous Debut III turntable.
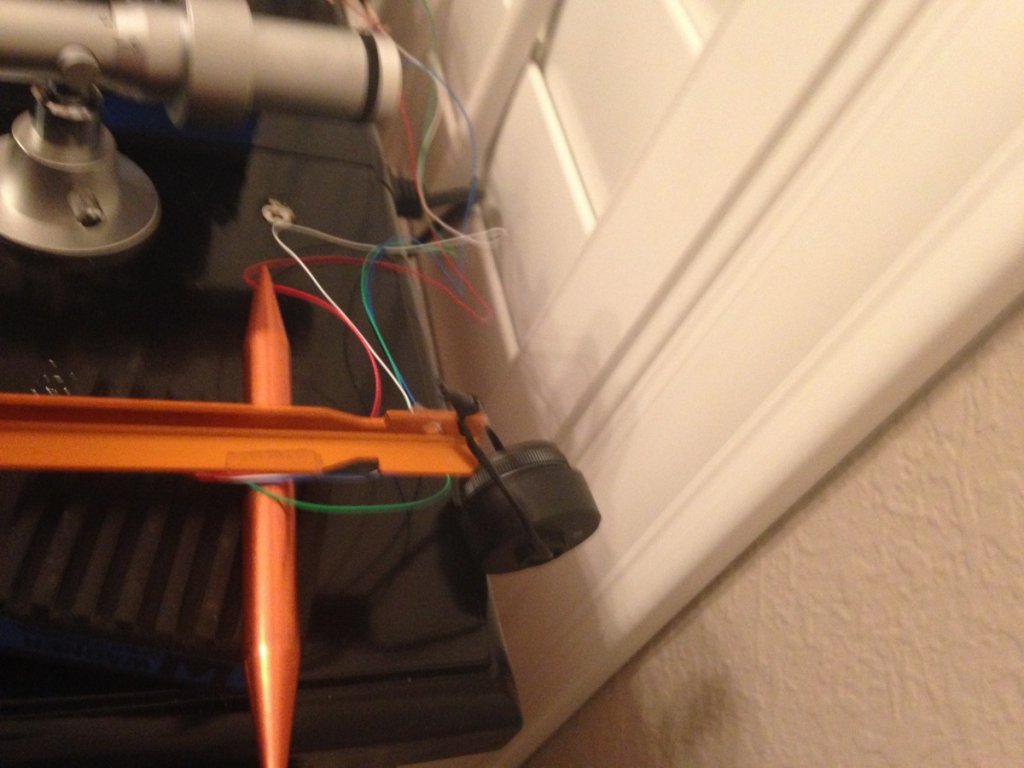
So how did it do? Well the arm wouldn't move across but it did have a little play because the U-glue tab didn't
hold it solid. When I moved it to the correct position by hand it sounded fantastic for a number of revolutions.
The VTA wasn't obviously correct either, but I'm still working on that part. I believe the best part is the
aluminum tent stake for the arm. It would be better if it was longer, but works as is. I need a better way to move
the arm across. I was thinking of a lateral counter weight but I'm not sure that would work. I need a better
tonearm support too. Thinking of using some epoxy as it would give it time to fix it at the right angle and be
solid.
Equipment:
Pioneer VSX-d912k receiver, Apt Holman preamp, AV Outlet 14ga. speaker wire, JBL Studio 530 speakers,
Ortofon 5e cartridge, Ortofon Blue cartridge, Sanus Basic foundation speaker stands.
It has got to be able to be done CHEAP! I know it can!
Pics: