M3 Sapphires -- Unboxing and Assembly photos

0 Members and 1 Guest are viewing this topic. Read 8416 times.

newzooreview

M3 Sapphires -- Unboxing and Assembly photos
« on: 27 Aug 2021, 08:32 pm »
Hi,

My M3 Sapphires arrived today. I thought I would post some unboxing and assembly photos since I hadn't seen any.

It was not too difficult to unbox them and put them together on my own, but I understand why the manual suggests having two people.

They arrived in 3 boxes. One for the two bases and one each for each speaker panel.


newzooreview

Re: M3 Sapphires -- Unboxing and Assembly photos
« Reply #1 on: 27 Aug 2021, 08:33 pm »
Each panel is wrapped in saran wrap and then a clear poly bag. The ends are fully encased in form-fit foam cushions.

They were not too difficult to hold on each side and lift into the house where I set them on the carpet face down as the manual suggested.


newzooreview

Re: M3 Sapphires -- Unboxing and Assembly photos
« Reply #2 on: 27 Aug 2021, 08:39 pm »
The carpet is soft, with a pad underneath, but I still put a small box under the front to lift the tweeter up about 1/2"

The tweeter has a pad on it as packed, and the grill over the tweeter is sturdy, but still I wanted to protect it as much as possible.


newzooreview

Re: M3 Sapphires -- Unboxing and Assembly photos
« Reply #3 on: 27 Aug 2021, 08:44 pm »
The supplied allen wrench is very sturdy, so there was no need to dig into the tool chest for a better one.

i used the standard spikes. The longer ones seem to be supplied for putting the speakers on thicker carpet.

The front of the base has two cones installed to angle the front upwards. The small standard cones screw into those. For the back spike there is nothing installed; it just screws into the base, so the rear spike is about an inch lower than the front two spikes.

I put the spikes on some Herbies titanium footers that slide.


newzooreview

Re: M3 Sapphires -- Unboxing and Assembly photos
« Reply #4 on: 27 Aug 2021, 08:51 pm »
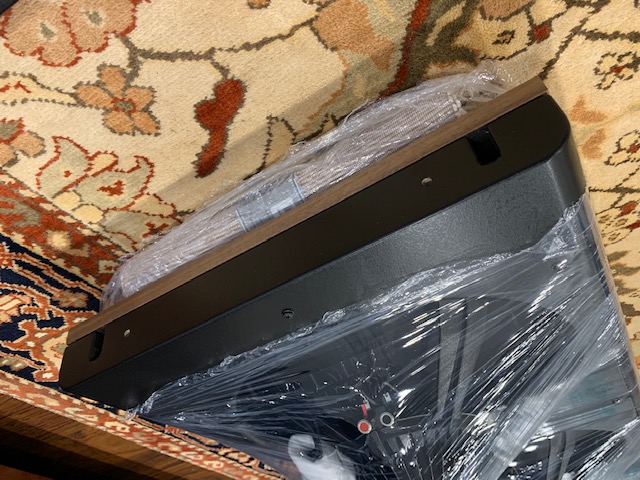
Installing the base was not that difficult.

I put a rolled up table cloth under the end of the speaker to lift it up so that the bolt could align easily. The speaker was raised 3-4" off of the floor.

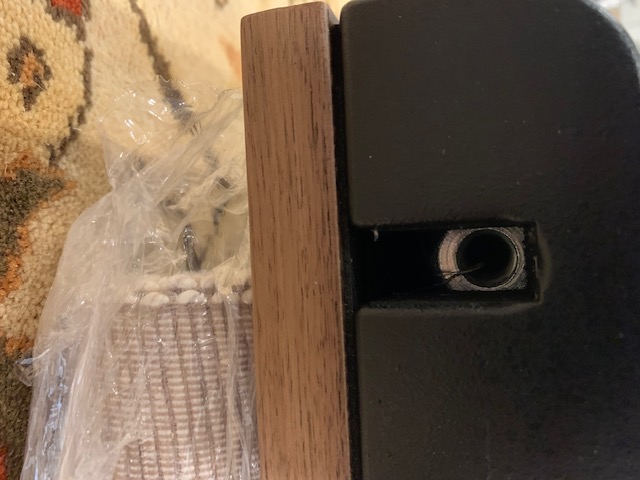
Here's one of the two bolt holes:


Here's the speaker sitting on the rolled up table cloth. I just peeled the plastic wrap back to install the base. I unwrapped them the rest of the way once they were standing up.


Here's one bolt screwed in part way so that I can install the bolt on the other side.

**The washer is just visible under the bolt head. The washer has some numbers stamped in it on one side. I faced the numbers towards the bolt head so they wouldn't mar the surface of the base when tightened down. This is admittedly meaningless since you'll never see that bottom when in use.**


geerock

  • Full Member
  • Posts: 314
Re: M3 Sapphires -- Unboxing and Assembly photos
« Reply #5 on: 27 Aug 2021, 08:51 pm »
Congratulations!
Interested to know what you are using to drive them.  Happy listening.

newzooreview

Re: M3 Sapphires -- Unboxing and Assembly photos
« Reply #6 on: 27 Aug 2021, 08:55 pm »
Once the bases were bolted on, I stood them up. Then I found the end of the plastic wrap and unwrapped them.

The cushion over the tweeters is not taped on.


newzooreview

Re: M3 Sapphires -- Unboxing and Assembly photos
« Reply #7 on: 27 Aug 2021, 09:00 pm »

Finally, I removed the protection from the tweeter wires and the huge Neutrik connector going into the base.

The tweeter connectors use a BFA banana connector just like the Anticables use. The BFA connector is a little wide and crimps in when you insert it, so it takes a bit of force to gently push it in. It does go in a good bit, but it will stick out about a 1/4 inch even when fully inserted.

The big chunky Neutrik Speakon connector has nibs that stick out, so it lines up and then it turns a quarter turn to click and lock.

I gently bent the wires to the Speakon connector so that they didn't touch the back of the woofer. I'm not sure if this was necessary.


newzooreview

Re: M3 Sapphires -- Unboxing and Assembly photos
« Reply #8 on: 27 Aug 2021, 09:06 pm »
That's it for about 200 hours of playing time. They sound listenable right now. Nothing horrifying.

I'm using a Benchmark AHB2 amp. Holo May KTE Dac and Holo Serene KTE preamp.

consttraveler

  • Jr. Member
  • Posts: 158
  • I think I won!
Re: M3 Sapphires -- Unboxing and Assembly photos
« Reply #9 on: 27 Aug 2021, 11:07 pm »
Thanks for the photos!  I'm expecting a pair of X-5's soon and I hope they will be as well packaged and easy to assemble.  Happy listening.

DBT AUDIO

  • Jr. Member
  • Posts: 261
Re: M3 Sapphires -- Unboxing and Assembly photos
« Reply #10 on: 28 Aug 2021, 01:50 am »
That's it for about 200 hours of playing time. They sound listenable right now. Nothing horrifying.

I'm using a Benchmark AHB2 amp. Holo May KTE Dac and Holo Serene KTE preamp.
Congratulations and I look forward to your feedback pairing your M3s with solid state gear and the monster Holo Audio May DAC!  I have the X5s with PrimaLuna EVO 400 preamp & power amp combo, Holo Audio Spring 2 KTE DAC & Cardas Clear cable loom.  I might upgrade to the Holo Audio May DAC down the road.

Enjoy!

newzooreview

Re: M3 Sapphires -- Unboxing and Assembly photos
« Reply #11 on: 28 Aug 2021, 01:54 am »
Thanks for the photos!  I'm expecting a pair of X-5's soon and I hope they will be as well packaged and easy to assemble.  Happy listening.

Thanks.

I think the X5s come with the base already attached, so no assembly for them. Just plug in and connect speaker cables. https://www.youtube.com/watch?v=spiojZBk2kY

 :thumb:

newzooreview

Re: M3 Sapphires -- Unboxing and Assembly photos
« Reply #12 on: 28 Aug 2021, 01:57 am »
Congratulations and I look forward to your feedback pairing your M3s with solid state gear and the monster Holo Audio May DAC!  I have the X5s with PrimaLuna EVO 400 preamp & power amp combo, Holo Audio Spring 2 KTE DAC & Cardas Clear cable loom.  I might upgrade to the Holo Audio May DAC down the road.

Enjoy!

Thanks. I'll give them a full 200 hours of break-in before I draw any conclusions.

doggie

Re: M3 Sapphires -- Unboxing and Assembly photos
« Reply #13 on: 28 Aug 2021, 02:10 am »
Thanks for the photos!  I'm expecting a pair of X-5's soon and I hope they will be as well packaged and easy to assemble.  Happy listening.

The X5's are extremely well packed. There is no assembly except to screw in the tips of the spikes.

Lifting them is another matter. At 85 pounds it is best best to have someone help you with getting them out of the box. It is easiest to open the box, pull out most of the packing, put the box upright and then "walk" the speaker out.

Enjoy!
« Last Edit: 29 Aug 2021, 02:09 am by doggie »

Memphisblues

  • Jr. Member
  • Posts: 8
Re: M3 Sapphires -- Unboxing and Assembly photos
« Reply #14 on: 28 Aug 2021, 11:53 am »
Congratulations !     They look fantastic!!   Looking forward to your listening impressions.   

dallaire1

  • Jr. Member
  • Posts: 245
Re: M3 Sapphires -- Unboxing and Assembly photos
« Reply #15 on: 28 Aug 2021, 12:30 pm »
Nicely done Newzooreview. Awe, the break in period... Enjoy the daily upgrades in sound quality !!

Mr. Big

  • Full Member
  • Posts: 632
Re: M3 Sapphires -- Unboxing and Assembly photos
« Reply #16 on: 28 Aug 2021, 02:05 pm »
Thanks for posting your unboxing. It will be helpful to many.  :)

jjss49

  • Full Member
  • Posts: 776
Re: M3 Sapphires -- Unboxing and Assembly photos
« Reply #17 on: 28 Aug 2021, 05:55 pm »
two person job for sure... reasonably strong backs and ability to crouch down is needed

forky

Re: M3 Sapphires -- Unboxing and Assembly photos
« Reply #18 on: 30 Aug 2021, 09:37 am »
Thank you for this. Timely as my M3s are arriving...........today!  :green: :green: :green: :green: :green:

franSSS

  • Jr. Member
  • Posts: 139
Re: M3 Sapphires -- Unboxing and Assembly photos
« Reply #19 on: 30 Aug 2021, 09:42 am »
Thank you for this. Timely as my M3s are arriving...........today!  :green: :green: :green: :green: :green:

Enjoy! Better give us a write up too!