Mojave's LS-6 build

0 Members and 1 Guest are viewing this topic. Read 17312 times.

mojave

  • Full Member
  • Posts: 342
Mojave's LS-6 build
« on: 3 Oct 2012, 04:24 pm »
After what seems like forever, I'm finally building out a pair of LS-6 speakers. I purchased 3 pairs of satin palisander cabinets at the AV123 auction. Last year I did an under-round on the woofer holes on a pair of cabinets and then decided to mess with the finish. It had some defects and veneer cracking so I decided to try to strip the finish. I've messed with it off and on during the past year. I tried various strippers and ended up trying the strongest methylene chloride stripper I could find (Rustoleum Aircraft Remover). I can't leave it on too long or the veneer will bubble. After putting in on and scraping off finish over several days I still can't get all the way down to the raw veneer. I don't know what these were finished with, but it sure is tough.  :o

I decided to give up for now on stripping that pair of cabinets and on Sunday I retrieved another pair that I had stored in a friend's basement. Monday evening I did an under-round on the router holes and installed the port tube flares at the back of the speakers. Last night before supper I installed No-Rez in one speaker. I cut it with my Bosch compound miter saw with a fine tooth blade. It cut great and didn't take too long. I used 3M Super 77 spray adhesive to help the No Rez stick to the cabinet walls. This morning I cut and installed No-Rez in the other speaker. I then took both speakers inside and put them on the dining room table.

Each woofer section gets 3 pieces of No-Rez. I cut the No-Rez so that it came to within 1 1/2" from the driver opening. I angled the side piece (under the tweeter section) in each woofer section by about 35 degrees on the bottom. The bottom piece by the port could be straight cut and pushed up flush to the angled piece. You don't need to angle cut both pieces.

I'll take some pictures either tonight or tomorrow morning.

Here is what I still need to do:
  • Install port tubes
  • Install Acousta-Stuf polyfill
  • Install other port flare
  • Wire and load drivers and tweeters
  • Install bypass caps and upgrades to crossovers (I have the original "factory" crossover boards)
  • Install crossover and Electra tube connectors
  • Install base
  • Connect speaker cables and listen!

I hope to have these playing by this weekend. :D

I have a question about the tweeter box. It has no hole. Where should I drill for the tweeter wires? Do I need to seal the hole with silicone or something after they are wired?


Danny Richie

Re: Mojave's LS-6 build
« Reply #1 on: 3 Oct 2012, 04:31 pm »
Awesome, and thanks for posting.

Quote
I have a question about the tweeter box. It has no hole. Where should I drill for the tweeter wires? Do I need to seal the hole with silicone or something after they are wired?

Drill two small holes that the wire will just slide through. Drill them near the bottom of the tweeter box just behind the terminals of the bottom tweeter. And feed the wire through it. If the hole is tight then it will be fine. If the wire is a little loose then dab a little bit of Silicone on it from either side. 

mojave

  • Full Member
  • Posts: 342
Re: Mojave's LS-6 build
« Reply #2 on: 3 Oct 2012, 06:03 pm »
Thanks, Danny. I sent you an e-mail requesting the LS-6 wiring diagram and crossover upgrade directions. I have no idea where I put them.

I'll be powering the LS-6's with a pair of Digital Amp Company Cherry Mono Pluses and Pi Audio power cables.

For subwoofers I have two infinite baffle manifolds with four 15" Acoustic Elegance IB15 drivers in each manifold. Each manifold is powered by a Face Audio F1200TS amp which provides about 500 watts per driver. The manifolds are in the floor in the left and right front of my room.


Here are pictures of the cabinets after I purchased them. I am now building out the left pair.


Danny Richie

Re: Mojave's LS-6 build
« Reply #3 on: 3 Oct 2012, 06:10 pm »
Quote
Thanks, Danny. I sent you an e-mail requesting the LS-6 wiring diagram and crossover upgrade directions. I have no idea where I put them.

I think I replied right back and sent it to you. If you did not get it please let me know.

Quote
Each manifold is powered by a Face Audio F1200TS amp which provides about 500 watts per driver.

Dang, that is a ton of power. That will require some high amp dedicated circuits.

jparkhur

Re: Mojave's LS-6 build
« Reply #4 on: 3 Oct 2012, 06:16 pm »
Agreed,   it appears that you have basement use here and an old time floor grill.  I would run a dedicated 20 amp circuit for sure to the sub amps and even to the other electronics if at all possible.  I find in my own home it did make a JND when listen to certain amps as well as limiting the light flicker before I got a new 200 amp box...

JP


Jerrin

Re: Mojave's LS-6 build
« Reply #5 on: 3 Oct 2012, 06:25 pm »
Awesome build.    You'll have a smoking HT when it's all said and done.   

Are you planning on using a LS-C with these?

mojave

  • Full Member
  • Posts: 342
Re: Mojave's LS-6 build
« Reply #6 on: 3 Oct 2012, 06:33 pm »
Danny, I did not get the e-mail. I also checked my junk e-mail folder and nothing from you was in there.

I have everything to install 3 20 amp circuits and it is on my to-do list sometime in the next few weeks. I also have to extend a circuit to my retractable Center Stage XD projector screen. The extension cord hanging from the ceiling looks tacky.

Quote
it appears that you have basement use here and an old time floor grill.
It is a brand new "made in India" grill from Van Dyke's Restorers.  :) I've got two and people just think they are part of my HVAC system. My house was built in 1890 so I thought they looked appropriate. 

Danny Richie

Re: Mojave's LS-6 build
« Reply #7 on: 3 Oct 2012, 06:39 pm »
Quote
Danny, I did not get the e-mail. I also checked my junk e-mail folder and nothing from you was in there.

Okay, send me another one and I will respond to it again.

Quote
I have everything to install 3 20 amp circuits and it is on my to-do list sometime in the next few weeks. I also have to extend a circuit to my retractable Center Stage XD projector screen. The extension cord hanging from the ceiling looks tacky.

Man that is good. I think you can only pull 2,400 watts of power from a 20 amp circuit (max). And most solid state amps are about 60% efficient so you can produce in the neighborhood of about 1,400 to 1,500 watts of power from each circuit. It would be more if the amps are digital type with switching power supplies, and much less with tube amps.

mojave

  • Full Member
  • Posts: 342
Re: Mojave's LS-6 build
« Reply #8 on: 3 Oct 2012, 06:56 pm »
Awesome build.    You'll have a smoking HT when it's all said and done.   

Are you planning on using a LS-C with these?
I just saw you are getting some tricked out amps from Gary.  :icon_lol:

I don't plan on getting an LS-C. I am currently using a phantom center and like it. I am having enough trouble convincing my wife to let me use the LS-6 speakers. She thinks they are way to big. I am moving most of my gear so that just the speakers, amps, and 24" monitor are in the front of the room to help it look better. I'm having about 26 guys over on October 27 as part of the Omaha Home Theater Tour and it will be interesting to see what they think of the phantom center when the projector screen is down. I should put another empty LS-6 cabinet in the middle so they think there is a center speaker.  :)

mojave

  • Full Member
  • Posts: 342
Re: Mojave's LS-6 build
« Reply #9 on: 4 Oct 2012, 02:08 pm »
Last night I installed the port tubes and this morning I filled with poly-fil and then put on the port flares. Here are some pictures:


Hugh

  • Industry Participant
  • Posts: 1329
    • Angel City Audio
Re: Mojave's LS-6 build
« Reply #10 on: 4 Oct 2012, 02:41 pm »
Very nice.

mojave

  • Full Member
  • Posts: 342
Re: Mojave's LS-6 build
« Reply #11 on: 4 Oct 2012, 04:00 pm »
Thanks, Hugh.

I have some more No Rez. The bottom panel of my infinite baffle is 1 piece of 3/4" plywood. Would there be a benefit to covering the bottom with No Rez? With the opposed drivers the manifold is seems fairly inert.

mojave

  • Full Member
  • Posts: 342
Re: Mojave's LS-6 build
« Reply #12 on: 6 Oct 2012, 03:32 pm »
I just checked the Neo8 drivers and they are slightly too wide for the tweeter box on one speaker. They fit for the most part in the other speaker. Will they pull in when I screw them or do I need to widen the tweeter box?

Danny Richie

Re: Mojave's LS-6 build
« Reply #13 on: 6 Oct 2012, 03:36 pm »
I just checked the Neo8 drivers and they are slightly too wide for the tweeter box on one speaker. They fit for the most part in the other speaker. Will they pull in when I screw them or do I need to widen the tweeter box?

You can either sand a little on the edges of your box or on the edges of the tweeter.

If you choose to sand a little on the tweeter frames then be sure to tape over the tweeter openings first, front and back. 

mojave

  • Full Member
  • Posts: 342
Re: Mojave's LS-6 build
« Reply #14 on: 6 Oct 2012, 03:48 pm »
Thanks for the quick reply. Sanding the box is going to be a little messy since I already have all the poly-fil installed. I'll try to sand the edges of the tweeter.

mojave

  • Full Member
  • Posts: 342
Re: Mojave's LS-6 build
« Reply #15 on: 8 Oct 2012, 08:34 pm »
The speakers are finished!

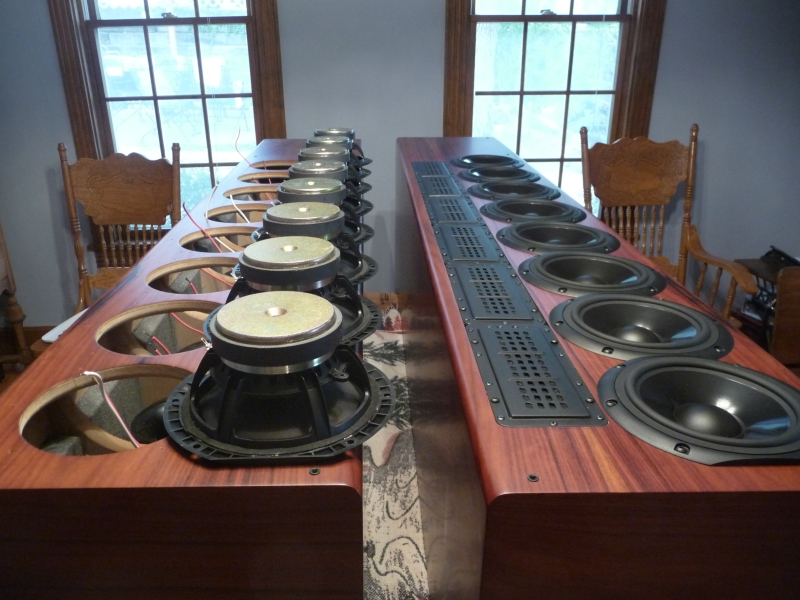
On Saturday I first had to sand the sides of all the tweeters because they were slightly too large for the tweeter box on my cabinets. I taped them and then sanded the sides with a belt sander. After wiring the tweeters on one speaker cabinet, I found that the tweeters were slightly too long, too. I removed just one tweeter and was able to sand it down a little to make them all fit. On the other side I sanded the sides of all tweeters and the ends of two tweeters just to make sure.

Next I installed all the drivers. I ran the wire through the holes in the internal baffles and ended up with just enough wire for the crossover, bass module, and binding posts. I think I had about 6" left over. After getting both drivers loaded I then attached the bases. I had to get some 1 1/2" long 1/4" bolts from Ace Hardware to bolt them on. I was able to get bolts in 8 of the 9 holes in each base. The other hole was slighly off.

Sunday afternoon I added the Platinum bypass caps and changed a few other things in the crossovers. I circled with red the parts removed and added. Since the board already had spots for all but one bypass cap, it was very easy to change them. I also soldered new wire leads to the board and then attached the bass module.

I added the Electra tube connectors per the instructions and soldered the leads back to the crossover. The bass module is supposed to fit on the access door, but the door was predrilled and the holes on the bass module for the tube connector pass thru didn't line up. I ended up drilling the binding post holes in the bass module larger and centering and screwing it to the door. The tube connectors then just barely fit through.

Before attaching the bass modules, I connected the crossovers to the speakers. Once the door/bass module was connected to the crossover, I then put the crossover into the speaker and screwed it down. The speaker wasn't predrilled, but I had some Spax screws on hand which made it fairly easy to do in combination with a short screwdriver. I stuffed some polyfill besides the crossovers and closed up the speakers.

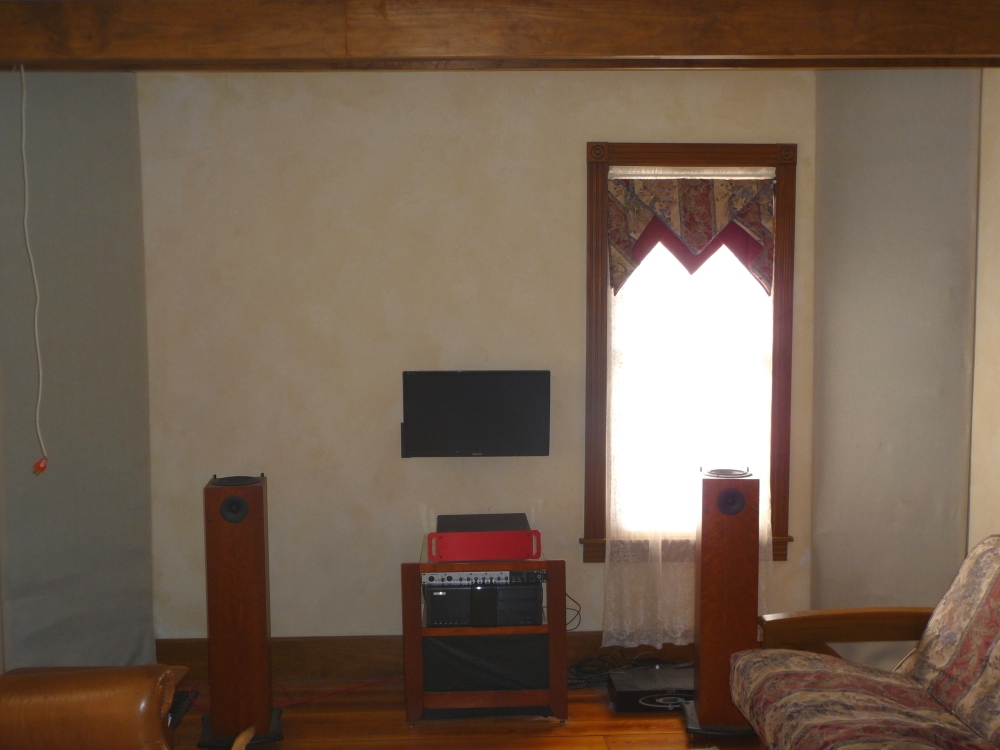
I put some 2" Magic Sliders on each corner of the bass. They come with double stick tape and adhered well. My dad came over and helped me lift the speakers off the dining room table and place in the living room. With the sliders, I could easily move the speakers around and position properly. I used my Bosch laser to get the speakers positioned within 1/16" of each other. The front is about 3' from the side walls and 2 1/2" feet from the rear wall. I have super chunk bass traps in each front corner of the room.

I have Realty Cables and wasn't sure how well the tube connector pins would fit and didn't have time to mess with them so I used some 6' cables with banana plugs for now. Does anyone know the gauge of the Realty Cables? It looks like two wires per spade.

After connecting the speaker cables I turned on the system. The speakers are completely silent even with my ear right up to the Neo8. Wait, I didn't say I started the music yet.  :) I started playing some music and sat back to listen. They work!

They are incredible! I think they are the best speakers I have ever heard.The bass extends down into the low 20’s with room gain (I haven’t measured them yet) and I could hear the 22 Hz notes on the song Deeper by Pete Belasco. The bass sounds better than most subwoofers I've heard  and is extremely articulate (I've heard about 13 different dual sub pairs this past year from Seaton, JTR, CHT, Hsu, Klipsch, and DIY). Music is so smooth, detailed, transparent, dynamic, and awesome. The speakers completely disappear with the soundstage the width of the room. The X-Omni's had a wide soundstage, but I'm hearing much more now out to the sides. There is so much more precision in the soundstage and not the diffuse airy feel that the X-Omni's have. I listened for about an hour last night and some more this morning. The bass has already improved. You can stand up and walk around and go up close and stand at the back of the room and it sounds similar and at the same volume.

Here are all the pictures. You can see the room with X-Omni's and with LS-6 speakers. The last picture is with my 126" AT screen descended in front of the speakers. The pictures aren't that great since there wasn't much light this morning when I took the pictures.


Cheeseboy

Re: Mojave's LS-6 build
« Reply #16 on: 8 Oct 2012, 09:03 pm »
Is it these Magic Sliders that you used?

http://www.magicsliders.com/ProductInfo.htm

You really knocked out this installation in a hurry.  There are three of us that are going to retro our LS6 from AV123 with the crossover upgrades, No Rez and Polyfil.  I'm going to add the Magic Sliders as well.  I hope you don't mind a few questions as we go along. 

You made it look easy!  Thanks for the encouragment.

mojave

  • Full Member
  • Posts: 342
Re: Mojave's LS-6 build
« Reply #17 on: 8 Oct 2012, 10:08 pm »
Yep, the second box from the right is what I used. I see on their website that they have anti-vibration ones for dampening speakers.

I used 5 1/2 sheets of No Rez. The top woofer section was wider than the rest. I also had one other woofer section slightly smaller than 5 1/2" on each speaker. Like I mentioned earlier, I adhered the No Rez with 3M 77 spray adhesive. The No Rez wouldn't stick good enough with its own adhesive, but I had some sawdust and stuff in my boxes even though I had tried to clean them out. I was able to cut a 35 degree angle on the side piece and then just put the back piece flush up against it without mitering a 2nd piece. The foamHere is what I cut per speaker:

Sides
1 piece 13" x 6 1/4"
7 pieces 13" x 5 1/2"
1 piece 11 7/8" x 6 1/4" with 35 degree angle on bottom
7 pieces 11 7/8" x 5 1/2" with 35 degree angle on bottom

Top - Insert before back piece in top woofer section
1 piece 13" x 9" with a notch cut out of one corner for the tweeter section

Back
1 piece 4 1/2" x 5 1/4"
7 pieces 4 1/2" x 5 1/2"

For the next area below the bottom driver I used the scraps and used two 13" x 2" pieces on one side, two 11 7/8" x 2" pieces on the other side, and two 4"  by about 4 1/4" pieces for both the front and back (top and bottom when speaker is lying down). Since you have to reach through a baffle hole to access this space, it was easier with smaller pieces. I did not put any No Rez in the crossover space, but I did put poly-fil in there. I was ready to move on and figured I could add some No Rez later.  8)

I bought Acousta-stuf from Parts Express and used exactly a 5 lb box for both speakers.

If you have the crossover boards, which I think you all have, the upgrades are easy. My 11 year old son pulled off the old components with a needle nose pliers while I touched the backside solder joint with the soldering iron. I had to cut the glue with a razor on a couple components. The 5 ohm resister was the hardest to remove. My son then inserted the new component's wire through the crossover and held it while I soldered it. You should be able to upgrade the crossover with the wiring to the speaker and bass module still intact.

The Ninja Master crossovers improved over time in my X-Omni's. If the LS-6 crossovers will also improve with several hundred hours then I'm in for a real treat.

Hugh

  • Industry Participant
  • Posts: 1329
    • Angel City Audio
Re: Mojave's LS-6 build
« Reply #18 on: 8 Oct 2012, 10:13 pm »
Didn't you see replace those Erse caps with better ones?

If not, you should.

HAL

  • Industry Contributor
  • Posts: 5198
Re: Mojave's LS-6 build
« Reply #19 on: 8 Oct 2012, 10:13 pm »
Those LS-6's are looking good! :)