First Veneer Project: X LS Encores

0 Members and 1 Guest are viewing this topic. Read 12647 times.

Captainhemo

First Veneer Project: X LS Encores
« on: 16 Nov 2014, 05:07 am »
Hey Fooks
After seeing so many great examples  of veneered projects  on Danny's circle,   I had some MDF left over from my recent H-Freame builds so I decided to build another pair of X LS Encores.

I picked up a sheet of  rotary cut Red Oak 10mil PB veneer from Oakwood Veneer.  I was going to use Heat Lock but  I couldn't find anyone in Canada who sold it so  I've gone with PVA, letting it sit till it skins over and then   ironing it just like Heat Lock.
Wouldn't you know  , the weekend I decide to  glue on the veneer, it turns  cold,  it is taking a long time for the glue to  set off but I'm getting there.  Lots of little tricks to learn
The first cabinet is done ,  the 2nd  will be  done tomorrow aside from   flush trimming out the various  cutouts.  Sides and front  were done in one piece with a 3/4" roundover on the verticle edges.

Here are a couple  shots of the first cabinet

(left side)


(front/left)


(rear/right)
-jay
« Last Edit: 16 Nov 2014, 07:04 am by Captainhemo »

DeeJayBump

  • Jr. Member
  • Posts: 167
Re: First Veneer Project: X LS Encores
« Reply #1 on: 16 Nov 2014, 05:23 am »
Looks nice at this stage. Looking forward to seeing that veneer when completed.

gregfisk

  • Restricted
  • Posts: 1349
  • Us alone in the universe? sure is a waste of SPACE
Re: First Veneer Project: X LS Encores
« Reply #2 on: 16 Nov 2014, 08:22 am »
Go Jay Go!!!!

Looking forward to another great build thread :thumb:

cody69

Re: First Veneer Project: X LS Encores
« Reply #3 on: 16 Nov 2014, 12:08 pm »
Quote
Lots of little tricks to learn

Looks great Jay. When I tried the iron on method, the veneer buckled and distorted from the moisture in the glue so much that it was hard to work with and difficult to apply to the substrate.
Did you encounter this issue -- and if so -- how did you deal with it?

lacro

  • Full Member
  • Posts: 602
Re: First Veneer Project: X LS Encores
« Reply #4 on: 16 Nov 2014, 03:02 pm »
Looking great Jay... I wish I had the sense to do something similar instead of being stuck with trying to get a perfect paint finish :duh:

Captainhemo

Re: First Veneer Project: X LS Encores
« Reply #5 on: 16 Nov 2014, 04:37 pm »
Looks great Jay. When I tried the iron on method, the veneer buckled and distorted from the moisture in the glue so much that it was hard to work with and difficult to apply to the substrate.
Did you encounter this issue -- and if so -- how did you deal with it?

Nope, didn't have  this issue at all.  Did you use paper backed veneer ?  If not, maybe try  that or if you did use a 10mil PB,  maybe try a 22mil ?
One issue I'm  having is  my edge trimmer is having a real tough time  going across the grain, makes things slow.

Larry,  just give it a try , so far I'm glad I decided to but then again,   we haven't seen the  finished results yet   :lol:

Greg,   no build thread on this one, lots of X LS Encore threads already.   Guess I could hae/should have  photo'd and documented  the veneering but didn't really think about it until after the fact,  so this will be a brief one

-jay

mlundy57

  • Industry Participant
  • Posts: 3579
Re: First Veneer Project: X LS Encores
« Reply #6 on: 16 Nov 2014, 06:22 pm »
Nope, didn't have  this issue at all.  Did you use paper backed veneer ?  If not, maybe try  that or if you did use a 10mil PB,  maybe try a 22mil ?
One issue I'm  having is  my edge trimmer is having a real tough time  going across the grain, makes things slow.

Larry,  just give it a try , so far I'm glad I decided to but then again,   we haven't seen the  finished results yet   :lol:

Greg,   no build thread on this one, lots of X LS Encore threads already.   Guess I could hae/should have  photo'd and documented  the veneering but didn't really think about it until after the fact,  so this will be a brief one

-jay

Looking good Jay.

For cross grain trimming I use a veneer saw. Multiple light strokes is the key with these saws.


$14 at VeneerSupplies.com. No matter where you get your veneer saw, the blade will need to be sharpened. For an extra $8 they will sharpen the blade for you.

You may also be able to use one of the small flush cut Japanese saws.

Another method is to use a flush trim bit. Put a piece of painter's tape where the bearing will roll. This will help keep the bearing from marking the veneer. It will also leave an overhang on the piece you are trimming the thickness of the tape. This is easily sanded flush. If you have rounded any edges the flush trim bit can get a little tricky in that corner.

Overall, I find the veneer saw easier to use. I use it for all my trim work, both cross grain and with the grain.  If the teeth clog up with dried glue it is a simple matter to clean them out. I find a small brass wire brush (the kind you'd find in the plumbing isle) works very well.

Mike

mlundy57

  • Industry Participant
  • Posts: 3579
Re: First Veneer Project: X LS Encores
« Reply #7 on: 16 Nov 2014, 06:46 pm »
Looks great Jay. When I tried the iron on method, the veneer buckled and distorted from the moisture in the glue so much that it was hard to work with and difficult to apply to the substrate.
Did you encounter this issue -- and if so -- how did you deal with it?

Did you let the glue dry really well before ironing?  With a cold press method (veneer press or vacuum bag) you apply the veneer while the glue is wet but with the iron-on method the glue on both the veneer and the substrate has to be dry. I have had some issues with Heat Lock glue if it was not completely dry. If it is the least bit tacky it behaves like contact cement, touch two pieces together and that's where they are staying.

I have found spraying the front of the veneer with veneer softener and letting it soak in (overnight is best but keep the veneer pressed flat the whole time) really helps with buckling, cracking and splitting, especially when rolling the veneer around edges that have been rounded over. The tighter the radius of the roundover, the more important the veneer softener is.

I have also had issues with raw wood veneer expanding from the heat of the iron then shrinking once it cools off. When this happens I end up with a seam that is not closed properly. This makes the seam very visible when the piece is finished. Unless I can figure out how to prevent the seams from opening up upon cooling I am going to restrict the iron-on method to backed veneer like Jay said. Personally, I like the 22.2mil bubble free veneer backing from Oakwood Veneer the best. Not only is the veneer more flexible and easier to work with, minor imperfections in the substrate (cabinet) don't telegraph through like they do with the 10mil backing.

Mike

mlundy57

  • Industry Participant
  • Posts: 3579
Re: First Veneer Project: X LS Encores
« Reply #8 on: 16 Nov 2014, 07:20 pm »
Looking great Jay... I wish I had the sense to do something similar instead of being stuck with trying to get a perfect paint finish :duh:

Larry,

That is exactly why I veneer my pieces rather than painting them. I can make a nice piece of veneer look really good with minimal tools and no spray equipment. The best I can manage with paint is amateurish at best. I can't come close to the finishes you get.

Veneering scared me at first but I found it wasn't all that difficult. I messed up a pair of AV-1 cabinets I was building (glued the front baffles on inside out) so I decided to use them for practice. For my first attempt at veneering, I used veneer with a PSA backing. That way I didn't have to worry about whether I got the glue on properly and could concentrate on application. Yes, there were mistakes made and I learned from them. But then, it wasn't like this was actually going to be a speaker anyway.  After that I started using Heat Lock glue and an iron.  Each time I do a piece I learn something else.

As Jay said, just jump in and do it. As long as you are not practicing your first attempt on your project what's the worst that can happen, you end up painting the project?  The only thing you are really out is some scrap material you used to make your practice piece and the veneer. The veneer doesn't have to cost an arm and a leg either. For practice, you can get paper backed veneer for $1.00 - $1.50 a square foot and some nice domestic veneers for $2.50 - $3.00 a square foot.

Mike

Captainhemo

Re: First Veneer Project: X LS Encores
« Reply #9 on: 17 Nov 2014, 05:05 am »
Thanks for the tip on the veneer saw Mike, if I decide  to do more  projects using veneer,  I'll definately pick one up.   After having to trim cross grain  across teh  sides and boffle (both top & bottom) I've decided  it would  be well  worth the $$   :lol: What PITA !!  I almost pulled out the router and flush trim bit but was afraid of  chipping, is that usally an issue ?     Guess I'm going to find out  when I trip out the cutouts

I would think the wrinling/buckling  from the wood glue would be more of an issue with non backed beneers.  Would the paper not protect the actual wood  somewhat from  absorbing a lot of moisture.  I had no issue with    curling or wrinkling  when   I pu tthe glue on,  and I was pretty liberal with it too  I'd  think with a thicker backer  or even maybe the  phenoic backer ,  the issue maybe even less ...

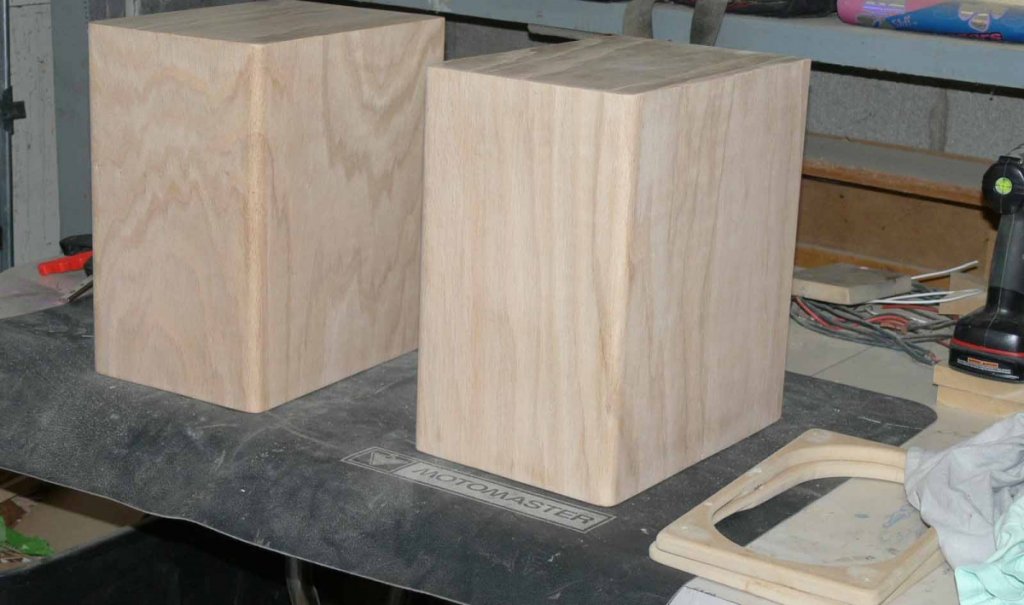
anyway, after an afternoon of many interuptions,  I finally finished up the 2nd cabinet


Now to fiugre out   what I'm doing for a finish... while I don't want the  red of the red oak to be a standout,  I do want the red  tones to come through.  I'm thinking of going with a dark walnut  Watco  with a wipe on Poly top coat
I've tried a couple other things on some test boards but  am not at all happy with the results

-jay

mlundy57

  • Industry Participant
  • Posts: 3579
Re: First Veneer Project: X LS Encores
« Reply #10 on: 17 Nov 2014, 05:26 am »
If you don't tape the veneer down when you apply the glue it will curl and warp. Taping the edges down, and keeping them taped down until you are ready to apply the veneer prevents that.

I haven't had any problems with raw vs backed veneer except for the shrinkage at seams with the raw.

Mike

cody69

Re: First Veneer Project: X LS Encores
« Reply #11 on: 17 Nov 2014, 11:27 am »
Quote
Did you use paper backed veneer ?  If not, maybe try  that or if you did use a 10mil PB,  maybe try a 22mil ?

I'm sure you're right and that had a lot to do with it -- I was using raw non-backed veneer that buckled significantly from the moisture in the glue.

Your LSs look sharp -- waiting to see them with the finish applied.

Captainhemo

Re: First Veneer Project: X LS Encores
« Reply #12 on: 17 Nov 2014, 04:14 pm »
I like Mike's suggestion of taping the edges down while applying the glue and letting it dry like that.  Although I got  lucky and didn't have any issues with  curling/buckling,  it  sounds like a pretty simple precaution for future projects

I'm looking for ward to the finishing myself, hopefully I can get out  to pick up some oil this evening


-jay

Captainhemo

Re: First Veneer Project: X LS Encores
« Reply #13 on: 18 Nov 2014, 10:45 pm »
Just a couple  pics to put up.
I did decide to go wit the  Watco danish Oil in  dark Walnut  hoping  just a hint of the red would  come through , we'll see when  it's all done.

Did the first 30 minute wipe down making sure no areas became dry .  Tomorrow it will be a wet sadning  using the oil.  Sorry the pics are under flourescent lights


-jay

mresseguie

  • Full Member
  • Posts: 4715
  • SW1X DAC+ D Sachs 300b + Daedalus Apollos = Heaven
Re: First Veneer Project: X LS Encores
« Reply #14 on: 18 Nov 2014, 11:02 pm »
Thanks for posting these pics and your progress.  :thumb:

I'm slowly learning.

gregfisk

  • Restricted
  • Posts: 1349
  • Us alone in the universe? sure is a waste of SPACE
Re: First Veneer Project: X LS Encores
« Reply #15 on: 18 Nov 2014, 11:36 pm »
Very nice grain Jay, looking forward to your progress.

Greg

Peter J

  • Full Member
  • Posts: 1876
  • Hmmmm
Re: First Veneer Project: X LS Encores
« Reply #16 on: 19 Nov 2014, 02:37 am »
Jay, tell me you've got a plan for cuttin' some holes in those boxes  :scratch:

Captainhemo

Re: First Veneer Project: X LS Encores
« Reply #17 on: 19 Nov 2014, 03:28 am »
hmmm,   what do I need holes for  ?    :lol:

Actually,  holes are already cut.... I'm hoping to use a flush trim bit set very shallow  to  just  trim out the veneer.... is that a bad idea ?

-jay

Peter J

  • Full Member
  • Posts: 1876
  • Hmmmm
Re: First Veneer Project: X LS Encores
« Reply #18 on: 19 Nov 2014, 03:34 am »
Flush trimmer would work for thru-holes, but what about the tweeter rabbet? Someone has suggested a really skinny bottomed self guided trimmer, but I've never used it.

I was just thinkin' you'd wanna have those cut out before finishing...no?

Captainhemo

Re: First Veneer Project: X LS Encores
« Reply #19 on: 19 Nov 2014, 03:52 am »
I have a flush trim bit I got from China with a skinny little bearing, it measures  .125 with my calipers  so hopefully I just make it.  At one point I had planned  to not  even cut the  tweeters (rabbits and through holes) until after I veneered but then I decided to do it this way, not really sure why  :scratch:

And yeah, you're right,  I should  do that  next  before getting any further into it  I guess

-jay