New MTM - Audio Bliss

0 Members and 1 Guest are viewing this topic. Read 6103 times.

AvFan

New MTM - Audio Bliss
« on: 5 May 2011, 04:01 am »
Just about two years ago I contacted Rick Craig about getting a MTM kit from him.  The Prestigio had just been introduced and based upon listening to other MTMs I inquired whether I could get the Prestigio as a kit however it was more than my budget.  Rick was very accommodating and designed me a MTM that fit my budget and included SB Acoustics 5" mids and a RAAL tweeter.  I have built many pieces of furniture and was excited to take on a new kind of woodworking project by building the enclosures.  I had a lot of other demands on my time in the intervening period but I found time over the last couple of months to finally build my MTMs.  I regret not finishing them sooner!  The results are pictured below.


Any deficiencies in my woodworking skills are certainly overcome by how wonderful these speakers sound.  As an MTM they are really designed for the seated listener plus they are easy to listen to and have wonderful imaging.  That RAAL tweeter is simply amazing in its ability to reproduce high frequencies.  I'd listened to other speakers with ribbon tweeters and determined the next set of speakers I purchased would have ribbons.  The RAAL is off-the-charts good.

Some design details:  The center of the tweeter is 38" off the floor.  These are being used with a subwoofer and they seem to like running down to 60Hz.  The crossover is located for easy access in the lower portion of the cabinet which is not part of the driver enclosure. The base is painted MDF and uses Dayton spikes.  The cabinets are 3/4" MDF with a 1" MDF baffle then covered with walnut veneer.  The trim is solid walnut with a 3/8" round over per Rick's design.  The grills are made from 3/4" MDF and use magnet pairs (under the baffle veneer and in the grill) to hold them on to the enclosure.  I have more pictures if anyone would like to see them.

Lastly, Rick was terrific to work with.  He created an amazing speaker for me that fit my budget.  And even two years after I purchased the kit he was very accessible and answered all my questions.  He also worked me through a bit of wiring trouble I caused to get these speakers working properly.  If someone is considering purchasing a kit from Rick I wouldn't hesitate. 

Thanks Rick!!


SlushPuppy

Re: New MTM - Audio Bliss
« Reply #1 on: 5 May 2011, 04:48 am »
I wish I had the skills and the time to do something like that. Those speakers look beautiful, and must sound wonderful with that RAAL tweeter.


Happy listening!

Slush

Tyson

  • Full Member
  • Posts: 11112
  • Audio - It's all a big fake.
Re: New MTM - Audio Bliss
« Reply #2 on: 5 May 2011, 06:24 am »
I hate most speakers, but Rick truly knows what he is doing. 

eclein

  • Volunteer
  • Posts: 4562
  • ..we walk the plank with our eyes wide open!-Gotye
Re: New MTM - Audio Bliss
« Reply #3 on: 5 May 2011, 08:03 am »
They look very sharp, I too wish I could do something like that....... :thumb:

AvFan

Re: New MTM - Audio Bliss
« Reply #4 on: 7 May 2011, 07:32 pm »
Thanks all for the kind comments.  :D These speakers were a great way to combine two of my "addictions", audio and woodworking for mutual benefit.  I've got my eye on a TC-12 subwoofer kit from Rick to compliment these MTMs.  That sub may be a bit of overkill for a stereo setup but it still is very tempting.  One closeup of the business end of these speakers:


Bill Baker

  • Industry Participant
  • Posts: 4887
  • Purity Audio Design -Custom Design and Manufacturi
    • Musica Bella Audio
Re: New MTM - Audio Bliss
« Reply #5 on: 7 May 2011, 08:12 pm »
Hi AvFan,
 The cabinets appear to be of top quality. Very nice job on them. I can imagine they sound as good as they look. Enjoy :thumb:

davesch

  • Jr. Member
  • Posts: 7
Re: New MTM - Audio Bliss
« Reply #6 on: 9 May 2011, 03:57 am »
AV Fan  - Very nice job. I , as you, enjoy audio and woodworking. Recently contacted Rick and he is working on a kit for me. I am hoping to start real soon, so I have speakers for the summer and then do the finishing work in the Fall. Woodshop closes June 1 here in Phoenix.  :roll:

AvFan

Re: New MTM - Audio Bliss
« Reply #7 on: 9 May 2011, 04:22 am »
davesch:  Rick, as you've probably discovered, is wonderful to work with.  He tailored my speakers to fit the design I wanted with what I wanted to spend and then followed up with great customer service well after the kit was delivered.  What kind of kit is Rick putting together for you?

I don't envy woodworking in the real low humidity and high heat of the desert.  I live about 25 miles from the coast outside of San Diego and we have big swings in temperature and humidity that can make woodworking, and particular finishing, a real challenge.  But nothing like Phoenix. 

I underestimated some of the skills I needed to build the enclosures and I spent a lot of time working through some challenges.  In part that is why I like woodworking and new kinds of projects.  And now I have two very nice speakers and I  just finished listening to Bruce Springsteen's, "Human Touch" and it sounded better than I'd ever heard it before.

Enjoy!


davesch

  • Jr. Member
  • Posts: 7
Re: New MTM - Audio Bliss
« Reply #8 on: 11 May 2011, 07:03 pm »
AvFan:

Yes, Rick seems really nice. He is working on the final design now. It will be a 3 way system.

Phoenix is terrible for finishing once the temperature rises which will be happening soon. So, I am just hoping that I can get them built before the end of May then finish them in Oct.

I would sure like to talk to you before I start to gain the insight on your challenges. WOuld you feel like pming me with your phone number so I could pick your brain?

Thanks
Dave

jimdgoulding

Re: New MTM - Audio Bliss
« Reply #9 on: 11 May 2011, 07:18 pm »
A sealed box design?  How low do they go?  Very nice work, too.  Thanks.

AvFan

Re: New MTM - Audio Bliss
« Reply #10 on: 11 May 2011, 08:00 pm »
Jim:  Thanks for the compliment.  These MTMs are sealed as I always intended to use them with a sub.  Rick and I talked about the crossover being around 80Hz but in my listening sessions I like them at 60Hz.  I'm using an Outlaw ICBM-1 (Integrated Controlled Bass Manager) which is really just a high/low pass filter but it allows a 24db/octave slope to roll off the subwoofer really fast and not overlap too much with the MTMs.  As I recall Rick didn't have the 200Hz and below curve but I have the one for 200Hz and above that I can post later.  I don't know exactly where the -3db point is but I suspect it is well below 80Hz given my listening sessions.

Dave:  I can always talk woodworking and will send you a pm later this evening.  FYI, my top "Ah ha" issue was the veneer.  For example, I fretted over how to prevent chip out while doing the circular cut outs.  Going across the veneer grain with a straight cut is easy to fix by simply scoring the veneer before the cut but a circle was much tougher.  I experimented with clockwise and counter clockwise routing to see if it made a difference (not really), different bits (straight and solid carbide spiral up cut- Yes!) and feed rate (slower is not always better) and still had some very minor chip out.  We can talk more but if there is general interest I can post some photos taken during the build and some insights.

fritzspeakers

  • Industry Participant
  • Posts: 118
  • FRITZSPEAKERS.COM
    • FRITZSPEAKERS.COM
Re: New MTM - Audio Bliss
« Reply #11 on: 11 May 2011, 08:48 pm »
Here is a little tip regarding "veneer chip out" on the above post.  Get some clear peel & stick vinyl covering that you line kitchen cabinets & drawers with from the grocery store.  It comes in a roll that is 18 inches wide by maybe 10 ft & costs about $4 or 5.  Press it on tight & take it off when you're done so it doesn't leave any sticky residue.  With real soft woods like Mahogany, you may get some smaller fuzz outs, but nothing like what can happen if you don't use it.  Hope this helps & good luck with all the projects!

AvFan

Re: New MTM - Audio Bliss
« Reply #12 on: 12 May 2011, 05:52 am »
Thanks for the tip!  I'll have to give the shelf liner a try on my next project which I hope is a new TC-12 sub kit from Rick.  The best solution I found was to use a brand new up cut spiral bit.  It is possible a down cut spiral would be better but chip ejection is a problem on those bits causing over heating.  The shelf liner sounds like a great solution.  Thanks again.

jeffh

Re: New MTM - Audio Bliss
« Reply #13 on: 12 May 2011, 09:16 pm »
... I can post some photos taken during the build and some insights.

Please do.  I am always trying to learn from the experts.

AvFan

Re: New MTM - Audio Bliss
« Reply #14 on: 14 May 2011, 02:15 pm »

Well jeffh, I'm not an expert but maybe the following will explain a bit of my process.  Any suggestions on better ways to do things are always appreciated.

I don't have any photos as I built the enclosure but I used 3/4" MDF for the sides, top, back, and brace (approximately mid way front to back) and 1" MDF for the front baffle.  1/4" deep rabbets or dados were cut for all these pieces to ease assembly with yellow glue and a 18 ga brad nailer.  Care was taken to not put brads where I was going to cut edge rabbets.  The majority of the Sonic Barrier cabinet liner was added during this part of the build too.  The front and back were then added and edged trimmed with a router so they matched.  The veneer was then added before cutting 3/8" rabbets on the corners and doing the circular cut outs. 

All this routing of MDF produces a tremendous amount of fine and really nasty dust.  I'm quite sensitive to the dust (formaldehyde) so I have to wear a respirator and get any dust off my skin quickly or I itch and almost burn from it.  A tight fitting dust mask would seem to me to be the minimum protection.  I have a vacuum attached to my table saw and I also rigged a vacuum attachment to my router that greatly minimize airborne dust.

This picture shows the enclosure at that stage.


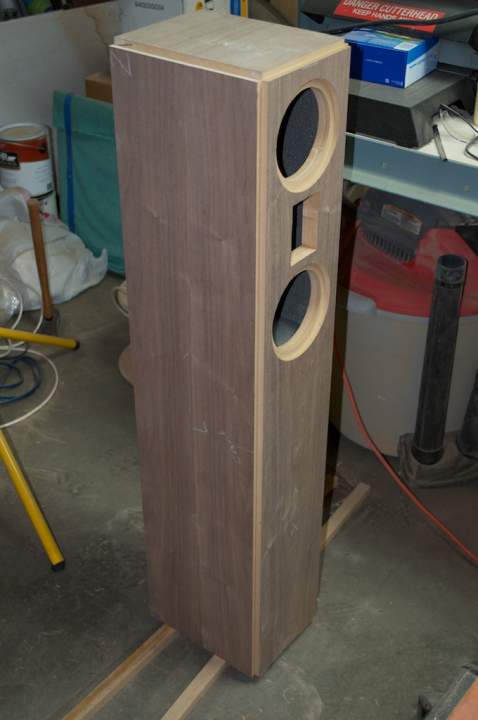
And a little closer look as I was test fitting drivers:


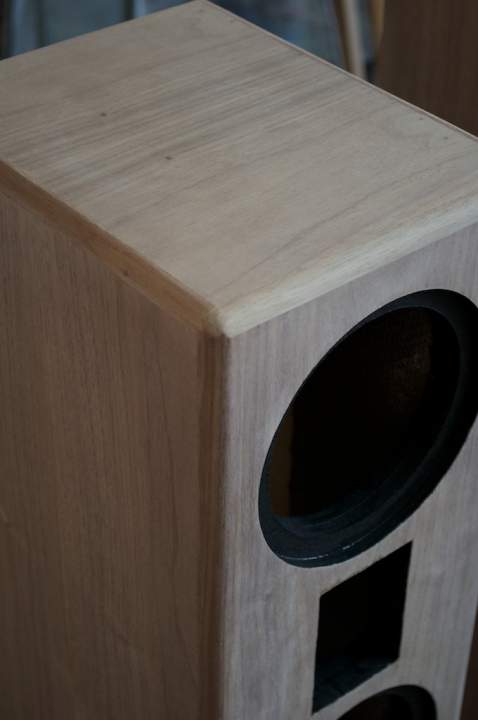
Then I carefully planed solid stock to fit the depth of the edge rabbets and glued them in place after mitering the corners.  The edge strips were trimmed to width and rounded (3/8") over with a router as can be seen in this picture.  You'll note I painted the exposed MDF black in case the drivers were a little loose in the cutouts.


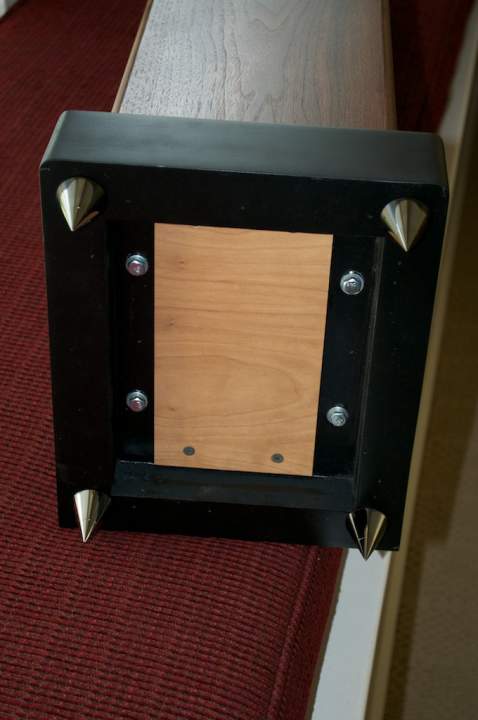
The bases on my MTMs were made with stacked 3/4" MDF.  The exposed edges were sealed with a thinned glue solution, painted with spray primer and finished with a spray satin. Between each step there is considerable sanding and resealing/priming to get a smooth finish.  I would use hard maple for any new bases versus MDF.  The MDF was just too hard to seal up and get a smooth finish.    Here is a picture of the underside of base showing the access to the crossover.  The bases are bolted to the enclosure with threaded inserts in a frame piece at the bottom of the enclosure.


It was fun to build these enclosures and even more fun to listen to them!